VBrick EtherneTV Portal Server EtherneTV v4.
Copyright © 2009 VBrick Systems, Inc. All rights reserved. 12 Beaumont Road Wallingford, Connecticut 06492, USA www.VBrick.com This publication contains confidential, proprietary, and trade secret information. No part of this document may be copied, photocopied, reproduced, translated, or reduced to any machine-readable or electronic format without prior written permission from VBrick.
Contents Portal Server v4.4 User Guide Organization . . . . . . . . . . . . . . . . . . . . . . . . . . . . . . . . . . . . . . . . . . . . . . . . . . . . . . . . . . . . . . v Getting Help . . . . . . . . . . . . . . . . . . . . . . . . . . . . . . . . . . . . . . . . . . . . . . . . . . . . . . . . . . . . . . v Font Conventions . . . . . . . . . . . . . . . . . . . . . . . . . . . . . . . . . . . . . . . . . . . . . . . . . . . . . . . . . vi Printer-Friendly . . . . . . . . . . . . . . . . . . . . . .
Viewing the Schedule . . . . . . . . . . . . . . . . . . . . . . . . . . . . . . . . . . . . . . . . . . . . . . . . . . . 30 Scheduling an Event . . . . . . . . . . . . . . . . . . . . . . . . . . . . . . . . . . . . . . . . . . . . . . . . . . . . 30 Recurrence. . . . . . . . . . . . . . . . . . . . . . . . . . . . . . . . . . . . . . . . . . . . . . . . . . . . . . . . . . . . 32 Advanced Settings . . . . . . . . . . . . . . . . . . . . . . . . . . . . . . . . . . . . . . . . . . . . . . . . . . . . . .
Portal Server v4.4 User Guide This Portal Server User Guide is written for anyone who will be using or evaluating the VBrick EtherneTV Portal Server. This includes system administrators, software developers, network technicians, and end users in a variety of business environments. The EtherneTV Portal Server is a web-based portal for accessing and managing video assets including both live or stored audio and video files.
usually answer your technical questions in 24 business hours or less. Also note that our publications team is committed to accurate and reliable documentation and we appreciate your feedback. If you find errors or omissions in any of our documents, please send e-mail to documentation@vbrick.com and let us know. For more information about any VBrick products, all of our product documentation is available on the web. Go to www.vbrick.com/ documentation to search or download VBrick product documentation.
Chapter 1 Introduction Topics in this section Overview . . . . . . . . . . . . . . . . . . . . . . . . . . . . . . . . . . . . . . . . . . . . . . . . . . . . . . . . . . . . . . . . . 1 Portal Server Home Page . . . . . . . . . . . . . . . . . . . . . . . . . . . . . . . . . . . . . . . . . . . . . . . . . . . . . 3 Overview The VBrick EtherneTV Portal Server is a web-based portal for accessing Live and OnDemand audio and video files.
PC Type Requirements Macintosh PCs • • • • • Linux PCs • Red Hat Fedora 9.1 • Firefox 2.0. • 512 MB RAM. Mac OS X 10.3 or higher for PowerPC. Mac OS X 10.4 or higher for Intel-based PC. Firefox for Macintosh 2.0 or higher. QuickTime Player 6.0 or higher. Internet Explorer on a Macintosh is not supported. Table 2. Supported Operating Systems and Browsers † Operating System Browser † Windows 2000 Internet Explorer 6.0, Firefox 2.0 Windows XP Internet Explorer 6.0, Firefox 2.
Introduction agree, these components are automatically installed and no additional download is necessary for subsequent access. For Linux PC users, the Portal Server may need to download components to your computer the first time you access the server. This can only be performed by a system administrator. See "Installing Linux Components" in the Portal Server Release Notes.
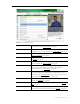
Figure 1. Live Broadcasts Page 4 Live Broadcasts View live streams (for example, TV channels) currently available on the network. See Live Broadcasts on page 5. Asset Library View pre-recorded content available from the VOD (Video-onDemand) servers on your network. See Asset Library on page 12. Scheduling View or create scheduled broadcasts of live or stored content. See Using the Scheduler on page 29. Status Shows the status of any videos currently being added or recorded. See Status on page 19.
Chapter 2 Using the Portal Server Some Portal Server functionality may be restricted to certain users. If you are not authorized to launch a Priority Alert or Add Video, for example, those menu items will not be displayed on the navigation footer on the Portal Server home page as shown in Figure 2. Your system may also have a hand-held remote control device. The VB-PC Remote is a hand-held infrared device that can be used to control (stop/start/pause etc.) any stream running on the Portal Server.
Channel Guide The Live Broadcasts page has a list of streams and stations. The "Channel Guide" is simply the list of stations (both custom stations and TV stations) shown at the top of the list. Custom Stations are defined by an administrator at your site. TV Stations already have program information provided by a third-party content provider. Other auto-discovered streams on your network may be displayed but these do not include "programming" data and are not considered to be part of the Channel Guide.
Using the Portal Server Note A red Record image in the Channel Guide is a visual cue that indicates a recording is in progress or scheduled. You use the Record push button below the preview window to record a live stream or the Record Program option on the popup menu to record (or schedule a recording of) a program Find Find content using specific search criteria. Enter characters or text, for example type "CNN," in the text field on the left and click Search .
Icons The Live Broadcasts page shows stations and streams that can be requested and played. Each item has its own icon and is preceded by a channel number. Custom icons can be assigned by an administrator to each station. A station may, or may not, have programming data. This icon denotes standard live streams. For example TV channels, without programming data, may have this icon. This icon denotes rich media presentations (those that have both video and PowerPoint slides, for example).
Using the Portal Server Control Buttons The icons on the bottom of the Preview Window control the video. (Note that the controls shown here for live broadcasts are different from those used for stored videos.) The buttons shown are for the Windows-based player. (Macintosh users may see the QuickTime Player buttons.) Mouseover each button to see the tool tip title. • • • • • • • • • • • ETV Portal Server User Guide – Slider at top. Not used with live video.
Messages The Messages area under the control panel displays any Global Message entered by the administrator; it will also display additional information about the selected video if it was customized by an administrator. The video title is shown above the Preview Window. Viewing Multiple Streams The video player can be configured by an administrator so that you can view multiple streams in separate windows.
Using the Portal Server 2. Press the red "record" button under the preview window. A message will note that a recording is in progress. Optionally, you can mouseover the program name and select Record Program . A red ball in the Channel Guide (Figure 2) indicates that a recording is in progress. T To stop recording 1. Press the red "record" button again. A message will note that the recording has been stopped.
the Live Broadcasts page. Once a device has been defined, it is available to all users (with access to that device) unless it is reserved for a scheduled event. If reserved for a scheduled event and in order to avoid conflicts, only the user who created the schedule can access the device. (Mouseover the hyperlink for a schedule event to see the owner.) Once defined, you can control a device using a graphical control panel.
Using the Portal Server Figure 3. Asset Library Title The title of the video clip is displayed after the icon indicating it is a video clip. A a thumbnail which provides a visual preview as to what is in the clip. Search Find videos using search criteria. Enter characters or text, for example type "CNN," in the text field on the left. You can search by All , Title, Keyword , Description , or any custom field created by an administrator.
Content The Asset Library folders have streams that can be requested and played. Each listing displays either a default file icon or a thumbnail image of the clip (see Creating Thumbnails on page 17), as well as information about the clip such as duration and keywords. This icon denotes standard video content. It can be replaced by an image or a thumbnail. This icon is used for bookmarks and playlists.
Using the Portal Server Control Buttons The icons on the bottom of the Preview Window control the video. (Note that the controls here are different from those used for live broadcasts, for example, there is no Record button.) Mouseover each button to see the button title. Note that Seek, Rewind, and Fast Forward are not available with MPEG-4 content. • • • • • • • • • • • • • Messages Seek – Use slider at top of control panel to move forward or backward in the video.
T To delete a stored video 1. 2. Click on the Info button to the right of any stored video. Click Delete Video and confirm. This will permanently remove the video from the Portal Server. T To customize a stored video 1. 2. Click on the Info button to the right of any stored video. Click Modify Info to display the customization page. 3. Change the Name, or Folder, and add a Description and Keywords as appropriate.
Using the Portal Server Link Title The title actually displayed on the Info page, for example "Click Here for More Information." Link Type • Web page URL – Enter a valid URL or copy and paste one from your web browser. • Uploaded File – Browse to select an upload file. This can be a PowerPoint, an image, or any file you want to make available to end users. Creating Thumbnails You can create thumbnails for all videos stored in the Asset Library that were recorded on the Portal Server.
T To bookmark any point in a stream playing in the preview window 1. 2. Launch any video from the Asset Library. Click the Mark button at any point in the video. This displays a message and creates a bookmark/playlist in the MyMedia folder. The bookmark defaults to the end of the file and has the following format:
Using the Portal Server server. For all other content, the closed captions are superimposed on the video as shown here. The actual placement of the closed captions will vary depending on encoding options. Scheduling The Scheduling page let you create (or view) a schedule of future VBrick events. These include scheduled broadcasts (of live or stored video), video conferences, auto-recording of future broadcasts, and the execution of previously defined scripts.
Priority Alert A priority alert can be launched by any ETV Portal Server user with appropriate permissions. It broadcasts a live or stored priority alert to specified VBricks or IPRs in case of an emergency. The broadcast is launched instantly, for a specified duration, and preempts all other broadcasts. (Any schedules whose start times occur during a priority alert are discarded.) It is not subject to copyright restrictions or expiration dates.
Using the Portal Server Stop Priority Alert Stop priority alert. Add Video If given publishing permissions, you have the ability to Add Video to any VOD servers for which you have access. The folders to which you can add video are configured by your system administrator. The folder list that you can add video to may also be different from the folders that you can view content from. If you have MPEG, WM, or H.
Source File Browse to the folder on your PC or a network drive that have the video you wish to add. Destination Choose a folder you would like to publish the video to. Only the folders you have permission to publish to will be shown in the dropdown list. Video Name Enter the name you want displayed on the ETV Portal Server interface. If adding Windows Media files, you must include the file extension; valid file extensions are .asf, .wmv, .wma , .mp3 , and .wsx .
Using the Portal Server delivered as a program stream. If your MPEG-2 content fails to ingest and play (and you have the right permissions), it may be a program stream. Try running it in StreamPlayer. If it does not run in StreamPlayer, it is likely a program stream in which case you can either re-stream the video and record it as a new file, or you can use third-party tools to transcode it. Table 4. Supported Stream Types Video Type Supported Stream Type MPEG-1 Any stream type.
T To run an existing playlist 1. Click on the Asset Library and navigate to the MyMedia folder or to any folder that has a playlist. Click on any item with a playlist icon to launch the playlist in the preview window. Use the Previous and Next buttons to move up and down the playlist. (Use the Forward and Rewind buttons to navigate to the beginning or end of the clip in progress—not to the beginning or end of the playlist.) 2. 3.
Using the Portal Server 6. Click Save Playlist and you are done. Note You may have folders without content but they are not displayed in the Asset Library. Playlists without content, however, are not allowed. You cannot create a playlist without first selecting content. Editing Playlists T To edit an existing playlist 1. 2. 3. Navigate to any existing playlist (or bookmark). Playlists have a special icon. Mouseover any playlist and click Edit Playlist .
Info Each playlist has its own searchable metadata. You can add/change the name, the folder, keywords, etc. For example you can add a description or keywords that can be used for searching, as well as links to external web sites and desktop files. See Customizing Stored Videos on page 15. Up Move clip up one position in playlist. Down Move clip down one position in playlist. Remove Use to delete individual clips from the playlist.
Using the Portal Server End † Sets the bookmark end time (default = end of file). There are two ways to set End time. (1) Launch the clip in the preview window and click End at the point where the clip will end. Use the Forward/ Rewind buttons to advance through the video as necessary.
Logout This command logs you out of the application and lets you log back in as a different user. This may be necessary to gain access to certain functionality. For example, some users may not be allowed to create thumbnails and you may want to login as a user who has the permissions to do this. The Logout hyperlink is only shown when Access Control is enabled by an administrator. 28 © 2009 VBrick Systems, Inc.
Chapter 3 Using the Scheduler Topics in this section Introduction . . . . . . . . . . . . . . . . . . . . . . . . . . . . . . . . . . . . . . . . . . . . . . . . . . . . . . . . . . . . . . 29 Live Broadcast . . . . . . . . . . . . . . . . . . . . . . . . . . . . . . . . . . . . . . . . . . . . . . . . . . . . . . . . . . . . 35 Stored Broadcast . . . . . . . . . . . . . . . . . . . . . . . . . . . . . . . . . . . . . . . . . . . . . . . . . . . . . . . . . . 38 Conference . . . . . . . . . . . . . . . . .
Schedule Privileges As shown below, Portal Server users may have limited schedule privileges in which case their ability to create or modify schedules is restricted. For example, anyone can view a schedule on the calendar page but users with "partial" privileges, for example, will only be able to drill down and modify a schedule they "own" (i.e. one they created). Mouseover any scheduled event on the calendar page to view the owner. Table 5.
Using the Scheduler Scheduling an Event The available content for creating a scheduled program include live streams from a VBrick encoder or stored files on an VOD server (or a VBStar). You can access the Scheduling page from anywhere in the application. Any scheduled programs currently in progress will display a TV icon and can be launched by clicking the icon or from the Live Broadcasts page.
3. Enter a Schedule Name and complete the Start and End fields. (To avoid format errors, click in the date and time fields and use the calendar and dropdown list respectively.) Depending on the view you selected above, these fields may be pre-filled. Schedule Name Alphanumeric, no special characters, must be unique. Maximum 128 characters. Start Use the calendar and the dropdown menu respectively to select start date and time.
Using the Scheduler Schedule time Set start, end, and duration. Duration cannot exceed 24 hours. Recurrence pattern Use the radio buttons and check boxes to set a Daily, Weekly, or Monthly recurrence pattern. A recurring event is shown on the scheduler with a special icon. Range of recurrence Describe the start and end of the range. End can be none, number of occurrences, or a specific date. 5. Select a Schedule Type.
When done, the named schedule is added to the calendar page of scheduled events. Any scheduled links use color-coded text as shown in Table 6. Table 6. Color-coded Scheduled Events Text Color Description Red Expired. The scheduled event is over. Yellow Future. The scheduled event will occur in the future. Green Active. The scheduled event is currently in progress. If the event is viewable (for example a stored video), a TV icon is displayed and you can click on it to launch the stream.
Using the Scheduler Create Schedule The final step in creating a schedule is to review and confirm the settings. If you are satisfied with the schedule and/or the recurrence pattern, click Create Schedule. If not click Modify and change the settings as necessary. Note that if you schedule a recording with a recurrence pattern, the filenames shown on the following window are automatically appended with the date and time, for example: filename>d>t.
T To schedule a live broadcast 1. 2. Select a schedule name, dates, and (optionally) recurrence pattern (see Scheduling an Event). For Schedule Type, select Live Broadcast and click Next . 3. In Select Video Source, choose one of the following and click Next . VBrick Select a live stream by VBrick name. Program Name Select a live stream by Program Name from all available. Enter Manually Enter an appliance source. T To use a VBrick as the Video Source 1. 2. Select VBrick as the Video Source.
Using the Scheduler 3. 4. Select the destination VBrick(s) or IPR(s) that will receive the video and click Finish . Verify the information and click Create Schedule to add the new schedule to the calendar. T To use Enter Manually as the Video Source 1. Select Enter Manually and click Next . 2. Enter the Schedule Start Options and click Next . The options vary as follows depending on the Source device type. Source Select one: MPEG-1, MPEG-2, MPEG-4, or WM.
Connection Mode (MPEG-4 only) Enter the video source location to connect to using one of the following. No special characters are allowed. If you enter the IP Address or Hostname of a VBrick encoder managed by the Portal Server, the availability will be verified. • IP Address/Host Name – must include Slot number (if dual encoder/decoder) and Management Port. • URL – use VBHTTP or RTSP format. For example: vbhttp://MPEG4Unit1/vbs1d1.sdp rtsp://172.2.3.
Using the Scheduler 3. Select the source of the stored broadcast. It can be either a VBrick VBStar (with a hard drive) or a VOD server. Each has a different icon. This icon denotes a VOD Server with a specific IP address. Navigate through the file system to a source video on the VOD server. This icon denotes a named VBStar with a hard drive (MPEG-2 or Windows Media). Navigate through the file system to a source video on the VBStar. T To use a stored video on a VOD server 1.
Conference Use these steps to create a video conference between two encoders/decoder pairs at different locations. This means that at the scheduled date and time a video conference will automatically be launched using two specified VBricks—one at each end. T To schedule a video conference 1. 2. Select a schedule name, dates, and (optionally) recurrence pattern (see Scheduling an Event). For Schedule Type, select Conference and click Next . 3. Select VBrick 1 , specify Private or Public and click Next .
Using the Scheduler Record Use these steps to create a schedule that will initiate the recording of live content. This means that at the scheduled date and time the live content will be recorded, optionally ingested and FTPed, and made available on the Asset Library page to authorized users for viewing. T To schedule a recording 1. Select a schedule name, dates, and (optionally) recurrence pattern (see Scheduling an Event). For Schedule Type, select Record and click Next . 2. 3.
NVR The recording will be saved to an NVR on the ETV Portal Server or to a standalone Network Video Recorder. See the Portal Server Admin Guide for more about NVRs. VBrick The recording will be saved to an MPEG-2 or WM VBStar. Record to NVR T To use an NVR to save the recording 1. Select NVR and click Next . Use the tabbed windows explained below to define specific attributes for the recording. Some of these attributes (e.g.
Using the Scheduler Custom Fields Field name Shown only if custom fields are defined by an administrator. Dropdown list Shown only if custom dropdown lists are defined by an administrator. Links Title Link title shown on the Info page for the recording. Web Page URL Actual web URL displayed when you click on the title. Expiration Expiration Date Shown if current user has copyright and expiration privileges. Content will expire after specified date in format: mm/dd/yyyy hh:mm AM.
Record to VBrick T To use a VBrick (MPEG-2 or WM VBStar) to save the recording 1. Select VBrick and click Next . 2. Enter a filename and then select a VBrick ServerName. This is the MPEG-2 or WM VBStar that will save the recording. Then click on the Advanced tab, and complete the other fields. Filename Filename of new recording. Filenames cannot exceed 25 characters and cannot include " : * ? < | [ ] If you append >d or >t to filename, it will include the date and time in mmddyy and hhmm format.
Using the Scheduler Record by Manual Entry When the Record Source is Manual Entry, you can only Record To an NVR. T To use Manual Entry as the record source 1. 2. Select a live stream from the list of Program Names. Go to Advanced Settings and select Manual Entry. MPEG-1 Enter a Program Name, or IP Address and Port number. MPEG-2 Enter a Program Name, or IP Address and Port number. MPEG-4 Enter a Program Name or URL. If URL, use VBHTTP or RTSP in following format: vbhttp://MPEG4Unit1/vbs1d1.
4. 5. Use the tabbed windows to define specific attributes for the recording. These are the same fields described above in Record by Program Name. When done click Finish , then verify the information and click Create Schedule to add the new schedule to the calendar. Script Scripts and Script Devices are created by Portal Server administrators. Use the following steps to create a schedule that will execute a previously-defined script on a previously-defined script device such as a camera or a VCR.
Using the Scheduler 3. 4. Select a previously-defined script and click Finish . Verify the information and click Create Schedule to add the new schedule to the calendar. Control Device Control devices are video sources like DVDs or VCRs that can be controlled by end users from the Portal Server. A control device is connected to a VBrick encoder. It allows clientside control of the device and must be configured by a system administrator.
48 3. Select a device and click Next . 4. 5. Select the destination VBricks that will receive the video and click Finish . Verify the information and click Create Schedule to add the new schedule to the calendar. © 2009 VBrick Systems, Inc.
Chapter 4 Using the Remote Controllers Topics in this section Using the VB-PC Remote . . . . . . . . . . . . . . . . . . . . . . . . . . . . . . . . . . . . . . . . . . . . . . . . . . . 49 Using the Amino STB Remote . . . . . . . . . . . . . . . . . . . . . . . . . . . . . . . . . . . . . . . . . . . . . . . 50 Using the WM IPR Remote . . . . . . . . . . . . . . . . . . . . . . . . . . . . . . . . . . . . . . . . . . . . . . . . . . 52 Using the STB Remote. . . . . . . . . . . . . . . . . . . . . . . . .
Table 7. VB-PC Remote Control Functions† Button Function Live Stream Stored Stream Mute Mute volume X X Vol +, Vol - Adjust volume X X Play Start playback X X Pause Pause playback Stop Stop playback X X Full Screen Go full screen X X Fast-Forward Fast-Forward X Rewind Rewind stream X Record Record stream X X † Only the buttons listed here are operational on the VB-PC Remote control. Remember that your computer has the primary volume controls.
Using the Remote Controllers Table 8. Amino Remote Control Functions Button Function Power Power on/off. STB/TV Press STB for normal operation to communicate with the STB. Use TV to communicate with the TV. 0–9 PIN entry only. Do not use to select channels. Left arrow Enter. Mute Not used. (Use volume controls on TV). AV Not used. Vol +/- Not used. (Use volume controls on TV). CH +/- Page Up/Page Down. Menu Display the list of menu commands. Blue arrow button Up/Left – up one channel.
Using the Amino Menu Click on MENU at the bottom of the window, or press the MENU button on the remote control, to access other Portal Server functionality. (Note that some Portal Server functions, e.g. Add Video, are not available on the Amino.) To return to the original program listing after viewing the menu, click MENU again. Note that you must have a wireless keyboard in order to use the Search command. Table 9.
Using the Remote Controllers mapped to any item and are non functional. Be sure to point the remote at the IPR—not at the TV. Button Function Standby Mute Mute the audio. Rew VOD content only: Rewind the current stream. Play Play the selected stream. Pause VOD content only: Pause the current playing stream. FF VOD content only: Fast forward the current stream. Replay Reserved for future use. Skip Reserved for future use. Stop Close the current stream.
Using the STB Remote This wireless remote control device is used with the Set Top Box (also called the Digital IP Receiver). The remote control unit is an infrared remote control device you point at the sensor on the front of the STB above the LEDs. As described below, the buttons on the remote control only work if the STB is configured for MCS or Local mode. If configured for LocalFullscreen , you can only use the Volume and Mute buttons. See Start Mode on page 10 for more information.
Using the Remote Controllers Stop, Play, Pause Once a stream is selected, the buttons across the top can be used to stop, play, or pause a video. Stop and pause are useful when playing VoD streams. Power Power the STB on or off. Begin/End The outer buttons on the second row are not used. Fast Forward/ Rewind The middle buttons on the second row are used with VoD to go Fast Forward or Rewind MPEG-1 and MPEG-2 videos; not supported with MPEG-4. Left Mouse Button Green.
56 © 2009 VBrick Systems, Inc.
VBrick Systems, Inc.