EtherneTV-STB Set Top Box STB v3.7.2d Admin Guide VBrick Systems, Inc.
Copyright © 2005 VBrick Systems, Inc. All rights reserved. 12 Beaumont Road Wallingford, Connecticut 06492, USA www.VBrick.com This publication contains confidential, proprietary, and trade secret information. No part of this document may be copied, photocopied, reproduced, translated, or reduced to any machine-readable or electronic format without prior written permission from VBrick.
Contents Preface Organization . . . . . . . . . . . . . . . . . . . . . . . . . . . . . . . . . . . . . . . . . . . . . . . . . . . . . . . . . . . . . . . . v Font Conventions . . . . . . . . . . . . . . . . . . . . . . . . . . . . . . . . . . . . . . . . . . . . . . . . . . . . . . . . . . . . v Related Documents. . . . . . . . . . . . . . . . . . . . . . . . . . . . . . . . . . . . . . . . . . . . . . . . . . . . . . . . . . . vi 1. Installation Overview . . . . . . . . . . . . . . . . . . . . . . . . .
5. Serial Port Passthrough Overview . . . . . . . . . . . . . . . . . . . . . . . . . . . . . . . . . . . . . . . . . . . . . . . . . . . . . . . . . . . . . . . . . . How Passthrough Works . . . . . . . . . . . . . . . . . . . . . . . . . . . . . . . . . . . . . . . . . . . . . . . . . . . . . Serial Port Pinouts . . . . . . . . . . . . . . . . . . . . . . . . . . . . . . . . . . . . . . . . . . . . . . . . . . . . . . . Using Telnet. . . . . . . . . . . . . . . . . . . . . . . . . . . . . . . . . . . . .
Preface VBrick's EthernetTV-STB Set Top Box is a leading-edge digital set top box that provides a low-cost standalone decoder for high-quality MPEG-1, MPEG-2, and MPEG-4 video assets. It's an ideal MPEG decoder for cost-sensitive installations that require large-scale deployment. The user-friendly set top box is controlled like a cable TV receiver using an IR remote control. It can be used to access live streams, to request stored content from a videoon-demand server, or to access the Web.
Related Documents The following documents describe key components in VBrick's EtherneTV solution.
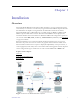
Chapter 1 Installation Overview EtherneTV Media Distribution System provides the ability to view live streams and stored assets directly on a television or monitor by using the EtherneTV-STB Set Top Box decoder. The EtherneTV Set Top Box is integrated with the EtherneTV Portal Server and the EtherneTV-NXG Video on Demand server to enable viewing of MPEG-1, MPEG-2 and MPEG-4 pre-recorded and live streams. The EtherneTV-STB can also be deployed as a standalone decoder without the need for an MCS.
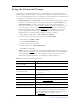
Using the Command Prompt You can use a Command Prompt interface to quickly perform a variety of tasks related to STB configuration and connectivity using the pman configuration utility. There are three ways to open a Command Prompt interface on the STB. Use whatever method is comfortable and available. Once connected, they all work the same way.
Installation Using pman pman is an text-based configuration program that runs from the Unix shell on the set top box. Its functionality mirrors the web-based configuration tool and you can use pman to set or edit all STB configuration parameters. In a typical scenario, you use a keyboard (wireless or PS/2) to open a Unix shell and you launch pman from that shell. You can also run pman using terminal emulation or Telnet. T To run pman using the wireless keyboard: 1.
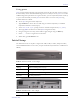
VGA Port Used to view video on a VGA monitor. Serial Port Used for Serial Port Passthrough or to open a command line window. PCI Card Slot Not used. S-Video Connect to standard TV. Video Composite video out. Audio Left/Right Audio out left and right. USB Ports (2) Connect USB mouse and/or keyboard. SPDIF Digital audio. Not supported. LAN1 Connect to local area network. LAN2 Not used. PS/2 Connect PS/2 keyboard or mouse.
Installation Finding the DHCP IP Address T To determine the IP address of the set top box when configured using DHCP: 1. Connect a keyboard and TV monitor to the set top box and apply power. (Use the optional wireless keyboard or a PS/2 keyboard). Wait for the box to completely power up before continuing. 2. Press Ctrl-Alt-F1 on the keyboard to open a command line window. 3. At the prompt type ifconfig and press Enter. This shows the IP address, the network interface configuration, and other parameters.
b. Select Network again. c. Select Domain NameServer IP Addresses and enter the Nameserver IP addresses. (If there is more than one, separate the entries with the pipe character (|), for example 172.16.1.11|172.16.1.10.) 15. When done, use the up arrow key to reach <. . . > and select using the Enter key on each screen. Answer Yes when prompted to apply changes and Exit to return to the user prompt level. Wait until the changes are applied and the interface returns; otherwise the changes may be lost. 16.
Chapter 2 Configuration Overview The STB configuration application is used to change the default settings for the STB. Once the IP address is obtained through the Command Prompt interface (see Setting the IP Address on page 4), you can access the set top box by typing the IP address into the Address field of a web browser, such as Internet Explorer. When the first page is displayed, select Log in from the navigation bar at the top of the page.
Logout Exits the configuration application. System Information Provides system-level information including version number, networking configuration, and memory usage. Note that the version number is shown in the upper-right corner of each window. System Time Use to set system time. System Update Use to update the software. See System Upgrade on page 27. Configuration Use to set all configuration parameters described in this document.
Configuration following screens is a configurable option; see Network Settings on page 14 for more information. Video Settings These settings generally relate to the video stream, for example Start Mode, MCS Location, Receive Address, etc. Network Settings These settings include Network, Ethernet, and Management SAP settings. Display Settings These settings let you adjust the resolution of your monitor. General Settings These settings include Serial Port, Security, System Update, etc.
Local UI Location Home Page Location/Home Page Enable Main Volume/Line 1 Volume RTSP Streaming Data Buffering Seconds Buffer Check for Underflow Lowest Bitrate for Buffer Check Audio Data Port/Video Data Port/CC Data Port RTP Data Port Proxy Type, HTTP Proxy Host and Port Options Panel Login Aux1–Aux8 Start Mode The EtherneTV STB can operate in one of three modes described here. Use MCS mode if there is an ETV Portal Server (formerly MCS) installed on your network.
Configuration Table 1. Receive Address Syntax Multicast MPEG-1 RTSP@MULTICAST_MPEG1://group:port/ Multicast MPEG-2 RTSP@MULTICAST_MPEG2_TRANSPORT://group:port/ Unicast or Multicast MPEG-4 with Remote SDP File http:/// Unicast or Multicast MPEG-4 with Local SDP File RTSP@ISMA_SDP_FILE:///wfs/, e.g. RTSP@ISMA_SDP_FILE:///wfs/mpg/currentmp4.sdp See Local-Fullscreen Mode with MPEG-4 Multicast for information on how to FTP the SDP file to the set top box.
C:\> ftp 172.22.117.70 User (172.22.117.70:(none)): root 331 Password required for root. Password: admin 230 User root logged in ftp> bin 200 Type set to I. ftp> cd wfs/mpg 250 CWD command successful. ftp> put vbs1d1.sdp 200 PORT command successful. 150 Opening BINARY mode data connection for vbs1d1.sdp 226 Transfer complete. ftp: 739 bytes sent in 0.
Configuration RTSP Streaming RTSP Streaming MPEG-4 streams in Local-Fullscreen mode only. Choose the protocol for RTSP streaming. If the source is a video-on-demand server, you must choose UDP. • UDP – MPEG-4 RTSP streams will be sent over UDP. • Interleaved (TCP) – MPEG-4 RTSP streams will be sent over TCP on the RTSP port. (Also called "RTSP Interleaved".) • Automatic – An attempt will be made to play the stream over UDP. If this fails, TCP will be used.
Proxy Type, HTTP Proxy Host and Port Not used. Options Panel Login Not used. Aux1–Aux8 Not used. Network Settings Network Ethernet Management Network These options are used to change network-related settings. The FTP server is used to transfer files to the STB from a remote device such as a PC. FTP Server User Name Username used to log into the FTP server on the STB. FTP Server Password Password used to log into the FTP server on the STB.
Configuration Ethernet These options are used to enable or change the Ethernet settings on the STB. Some or all may have been previously configured earlier. See Setting the IP Address on page 4. Network DHCP To change to Static, select option DNS via DHCP When using DHCP: If the DNS settings should come from the DHCP server, check the box (for yes). If not, uncheck the box (for no). Hostname via DHCP When using DHCP: If the host name will come from the DHCP server check the box (for yes).
Time to Live Determines the number of hops that a SAP will travel before being discarded. Type of Service The value of the TOS bits in the IP header of the management SAP packets. This parameter can be used to implement quality of service within a network. IP Address Determines the unicast or multicast IP address that the SAP will be sent to. Port Determines the IP port that the SAP will be sent to.
Configuration Splash Screen Choose the type of splash screen to display during startup: • Default – Use the default VBrick splash screen. • Custom – Use a custom splash screen. • None – Use a blank screen. Location of Custom The location of custom splash screen. The image should be in the Splash Screen .xpm file format and less than 320 x 240 pixels in size. Place the image in the /wfs folder on the set top box.
camera (pan-tilt-zoom), remote control of security doors, low speed data transport, or data collaboration between PCs. Passthrough: Responder If enabled, will be a Passthrough responder; else port will host a serial shell fixed at (9600, 8N1). Passthrough: Baud Choose the Baud Rate for serial port when Passthrough is active. Rate Default = 9600. Passthrough: Stop Bits Choose the number of Stop Bits for serial port when Passthrough is active. Default = 1.
Configuration Watchdog Frequency Default = 0 which means never reboot; 1 means reboot every day; 2 means reboot every second day, and so on. Watchdog Time is used in conjunction with Watchdog Frequency. Watchdog Time Choose time (on 24-hour clock) that this unit will restart. Enable Gateway Validation Specifies whether the network gateway should be validated at startup. Default = Enable. System Update These parameters are used to set system update options.
20 EtherneTV Media Distribution System
Chapter 3 Local Configuration Overview When the Start Mode is configured for Local , the STB will display static listings and previews of multiple channels on the network. These listing are hard-coded in an xml file. This xml file is used for Local mode installations only; it does not apply when operating in MCS mode or LocalFullscreen mode. (To select Start Mode in the web-based STB configuration application, go to Configuration > Video > Setup > Start Mode.
XML Configuration Examples Accessing the XML Configuration File The "configuration" file refers to the xml file (/wfs/localUI/stbLocalUIData.xml) that provides the list of streams available to the STB. This configuration file is used by stbLocalUITemplate.htm to populate the interface page. The xml file can be edited locally using a text editor (vi is included with the system) or it can be uploaded to a Windows desktop, modified with Notepad, and downloaded back to the STB.
Local Configuration ftp> bin 200 Type set to I. ftp> cd /wfs/localui 250 CWD command successful. ftp> put stbLocalUIData.xml 200 PORT command successful. 150 Opening BINARY mode data connection for ... 226 Transfer complete. ftp: 739 bytes sent in 0.12 Seconds ftp> bye XML Configuration Examples The following examples show how to modify the xml configuration file (/wfs/localUI/ for different media. stbLocalUIData.xml) Title and Global Message Settings.
SDP file retrieved through HTTP http://239.22.133.3/vbs1d1.sdp Example of live MPEG-4 multicast entry with local SDP addressing information. MPEG4 multicast-local SDP SDP file stored locally file:///wfs/mpg/mySDP.sdp Example of live MPEG-4 unicast entry with local SDP addressing information.
Local Configuration 172.22.133.5 vbrickvideo1 Example of MPEG-1 unicast entry with port address. Sample MPEG1 Unicast Sample MPEG1 Unicast stream 5555 Example of MPEG-2 unicast entry with port address.
Complete-Movies MPEG4 content on 172.22.119.118 2hr26mins58sec MPEG4 stream Example of MPEG-1 content from VoD-W server with IP address and program name. 172.17.17.
Chapter 4 System Upgrade Topics in this chapter Upgrading from v3.71 or Higher Upgrading from v3.70 or Lower Additional Upgrade Steps for Local Mode Upgrading from v3.71 or Higher Note If you are upgrading from version 3.7.1 or higher, it is recommended that you use the following procedure to update the set top box. You can use the procedure described elsewhere for older versions but this method is faster and easier. STB upgrades for set top boxes running v 3.7.
T To install STB software and/or the download application: 1. Double-click on Setup_STB_x_x_x.exe in the installer folder to launch the installer. Then click Next to continue. 2. Select the features you want to install: the Download Application , the Release Package , or both. Then click Next . (If you select only the Download Application , you will not be prompted to create an FTP user account as explained below.) 3. Select an installation folder for the Download Application and click Next .
System Upgrade 5. Select a destination folder for the Release Package and click Next . The default is c:\inetpub\ftproot\STBUser\Releasexxxx. (All Release Packages have incremental numbers in separate folders.) 6. Click Finish when done. 7. Navigate to Start > All Programs > VBrick > ETV-STBDownload to launch the download application. On Windows XP, if the download application is blocked and will not launch, you may need to turn off the Windows Firewall before launching the application.
IP Address IP address of upgrade server where the Release Package files are located. Username Name of FTP account on the upgrade server. Password Password used to login to the FTP server. Path The relative path to the folder in which Release Package files are located. Enter a relative path for the configured username. Do not enter an absolute path. (Note that the Release Packages are numbered incrementally in separate folders.
System Upgrade Upgrade individual unit Upgrade a single unit. Select the radio button and click Start Upgrade . A popup will prompt for IP Address and Password and automatically run the upgrade. The password is variable; the username (root) is fixed and cannot be changed. Note that all STBs selected for upgrade must have the same password. Configuration File Path Path to a pipe-delimited configuration file. See Editing a Configuration File on page 31. Select All Selects all STBs in the list box.
different password.) A sample pipe-delimited configuration file is shown below. You can create a valid configuration file from a text file by giving it a .cfg extension. 172.22.133.1|admin 172.22.133.2|admin 172.22.133.3|admin 172.22.133.4|admin T To edit an existing configuration file: 1. Select Upgrade using Configuration file. 2. Browse to an existing configuration file and click Open to populate the list box. 3. Go to File > Edit Config File and use any of the controls to edit the list. 4.
System Upgrade Upgrading from v3.70 or Lower The upgrade process described here is a two-step process. First you need to create an FTP server with IIS; then you can actually run the update using a web browser. Also, if you are using Local mode, you will need to perform the Additional Upgrade Steps for Local Mode on page 35. Note If you are upgrading from version 3.7.0 or lower, you must use the following procedure to update the set top box.
2. 3. 4. 5. Select Login and enter the username and password (the defaults are root and admin). Go to Configuration > General > System Update. Select FTP Server and enter an IP Address. Select Relative Directory Path and enter the path on the FTP server where the upgrade files are located. This field corresponds to the Home Directory set in the Default FTP Site Properties. This is a relative directory path and cannot start with a slash.
System Upgrade 6. If only one file is present, just type rm . Verifying the File Transfer There are two ways to indicate the progress of the transfer. Once the update is complete, the Web Administration program shows the version number in the upper right corner. You can also verify file transfer success using the command prompt: T To check the version number using the command prompt: 1. Press Ctrl-Alt-F1 on the set top box. 2. Type tasteversion to display the version number. 3.
36 EtherneTV Media Distribution System
Chapter 5 Serial Port Passthrough Overview Using serial port passthrough, STBs can provide full duplex, end-to-end transparent passthrough of user data from an STB to a VBrick, or to other networked devices. The STB has one serial port that can be used for passthrough. The serial port operates at its configured baud rate (e.g. 300 to 115.2 Kbps).
For example, a generic Telnet client configured to connect to an STB on port 4439 will cause the STB to start sending data from it's serial port, using the connection it accepted from the Telnet client. Note Once a Passthrough connection is established, the actual flow of data is symmetric between the ends of the connection. That is, the behavior of the serial ports with respect to typed characters will appear to be the same at both ends, Initiator and Responder.
Serial Port Passthrough together). This feature provides a method to broadcast alarm status or other information to multiple locations.
40 EtherneTV Media Distribution System
Chapter 6 Using the Set Top Box Overview The look-and-feel of the STB screen depends on how it is configured. Once configured with an IP address and powered on, the set top box opens in one of three Start modes depending on how it is set to operate. Each Start mode has a different "start" page that is displayed at startup. To configure Start mode in the STB configuration application, go to Configuration > Video > Setup > Start Mode .
stored videos) is determined and programmed by an administrator and downloaded to the STB (see Local Configuration on page 21 for more about how to create and download the configuration file). The page is hard-coded with links to different content. To change the available content, you need to modify and download a new page. Figure 1. Local Mode Local-Fullscreen Mode If the set top box is set up in Local-Fullscreen mode, there will be a (live or stored) video image on the TV at system startup.
Using the Set Top Box Figure 2. Local-Fullscreen Mode MCS Mode In MCS start mode, the start page is downloaded from a VBrick Media Control System. The live streams and videos displayed on the STB are configured in the ETV Portal Server (formerly MCS). In MCS mode, the STB has optional login authentication to protect against unauthorized use. If authentication is enabled, the STB will display a login window when powered on for the first time.
Figure 3. MCS Mode Using the IR Remote The remote control unit is an infrared remote control device you point at the sensor on the front of the STB above the LEDs. As described below, the buttons on the remote control only work if the STB is configured for MCS or Local mode. If configured for Local-Fullscreen , you can only use the Volume and Mute buttons. See Start Mode on page 10 for more information.
Using the Set Top Box Stop, Play, Pause Once a stream is selected, the buttons across the top can be used to stop, play, or pause a video. Stop and pause are useful when playing VoD streams. Power Power the STB on or off. Begin/End The outer buttons on the second row are not used. Fast Forward/ Rewind The middle buttons on the second row are used with VoD to go Fast Forward or Rewind MPEG-1 and MPEG-2 videos; not supported with MPEG-4. Left Mouse Button Green. Corresponds to left mouse button.
STB operation like navigation, selecting streams, etc. It has all of the handheld IR controls (see above) as well as a full QWERTY keyboard with a mouse pad on the right and mouse buttons on the left. The wireless keyboard is available from VBrick. When using a standard keyboard, it also helps to connect a standard (USB or PS/2) mouse to the STB. Once attached, go to General > Hardware > Mouse Type to configure the STB for the mouse you are using. Note that the STB has one PS/2 port and two USB ports.
Using the Set Top Box Icon Description Home Local and MCS mode only. Exits to the home page. In Local mode, it exits to the local home page; in MCS mode, it exits to the MCS home page. After returning to the normal STB user interface, press WWW again to hide the browser address bar.
48 EtherneTV Media Distribution System
Index A Accessing the Configuration File 22 Accessing the Web 46 Accessing the XML Configuration File 22 Assigning a Dynamic IP Address 5 Assigning a Static IP Address 5 Audio Data Port/Video Data Port 13 Audio Data Port/Video Data Port/CC Data Port 13 Aux1–Aux8 14 B Buffer Check for Underflow 13 C cables 7 Configuration 8 Connecting to the Network 4 Creating an FTP Server with IIS 33 D Data Buffering Seconds 13 Downloading to the STB 22 E Ethernet 15 F Finding the Assigned IP Address 5 Finding the DHC
T Telnet 38 Theory of Operation 37 U Uploading from the STB 22 Using a Web Browser to Run the Update 33 Using Telnet 38 Using the Command Line 2 Using the Command Prompt 2 Using the IR Remote 44 Using the IR Remote Control Unit 44 Using the Wireless Keyboard 45 V Verify the File Transfer 35 W Watch for Locked Files 34 Web Access 46 50 Index
VBrick Systems, Inc.