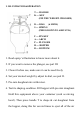
I. ILLUSTRATION&OPERATION T --- HANDLE K --- KEY (FIX THE WEIGHT CHOOSED) D --- DIAL (6 SIZES) S --- SPRING (PRESS DOWN TO ADJUST K) F --- FIX KEY A --- ARCH P --- PLUNGER H --- HOPPER B --- BOTTOM 1. Read equip.’s illustration to know more about it. 2. If you want to remove the plunger, see part III. 3. Clean it before use, make sure it can be used freely. 4. Set your desired weight by adjust its dial, see part II. 5. Pre-mix doughnut mix with mixer. 6. Test its shaping condition.
out of the valves. 7. Holding the bottom of the hopper about 1 1/2 inches from electric or gas fryer, then operating the equip to release the doughnut which ready to be fried. ! Keeping Hopper well filled to prevent air from getting into the valve mechanism. 8. If the donuts fried is not the size you want, adjusting the dial and repeat step 7. 9. Keep cutter cleaned as soon as possible after use. To better it, please oil lightly it after use. II.
! DO NOT try to change the dial setting without first depressing the spring to release the selector peg. ! DO NOT force or use any tool on the dial. It operates freely when the instructions are followed. III. REMOVE PLUNGER (see Illustration point F) Donut equip.’s plunger of depositor is locked in place with a peg key, held in place by a operating spring. This key is fixed to the release tab, which is located under the lower end of the spring.