
Installation Guide

181024
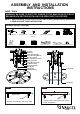
1. Carefully unpack the fixture, lay out the fixture on a clean surface.
2. Attach the mounting plate by using mounting screw to
the outlet box, and secure it to the celling with dry
wall screws and anchors.
3. Attach the fixture mounting screws and lock nuts to
the mounting plate, then secure it with ball nuts.
4. Install the Fixture (the Fixture is sold separately).
a. Remove the canopy from the fixture before
installation (See Figure 1~3.)
b. Side fixture : Thread the fixture wire through the
canopy as showed, and then secure the fixture
to the canopy with metal pad, washer and hex nut.
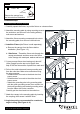
5. Cut any excess fixture wires leaving only about 8"
(20cm) length from the top end of nipple, then
strip off 3/4"the fixture wires of plastic from each end.
6. Pull out the outlet wires and house grounding wire
from the outlet box. Make wire connections using
the wire connector.
---All black wires from rods to the black wire from
power source.
---All white wires from rods to the white wire from
power source.
---Attach the grounding wire to the mounting plate
with the green grounding screw.Then connect it to
the house grounding wire and all grounding wires
from the frame with a wire connector.
Carefully put the wires back into the outlet box.
7. Attach the canopy to the mounting plate by inserting
the coupling, then secure it with the finial .
8. Angled mounting recommended for a vaulted or
angled ceiling. (See Figure. 4~6)
Turn off the power at fuse or circuit box.
Turn on the power at fuse or circuit box.
Installation Steps
Support Brace
Canopy
Coupling Kit
Figure.4
Figure.5
Support Brace
Canopy
Cord Clamp
Figure.6
Support Brace
Canopy
Loop
Figure.3
Canopy
Finial
Cord clamp
Remove the canopy from
the fixture before installation
Flat HeadScrew
driver