
Installation & Assembly

Page 4 of 4
ASSEMBLY INSTRUCTIONS (continued)
ASSEMBLY INSTRUCTIONS (continued)
FUNCTION AND OPERATION (continued)
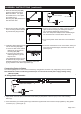
Fig.7.
B. Using linking cord:
Install the additional cabinet light fixture (A) by following steps 1-3 of the instruction steps. Once
installed, attach the linking cord (12 inches) (EE) between the cabinet light fixture (previously
installed) and the new one. (See Fig.7)
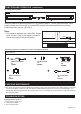
Note:
1. This hardware package has a label (DD). Please
paste the label (DD) on the cabinet, in order to
remind the position of the On/Off switch.
Label
Switch
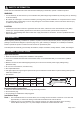
The following parts are available for re-order if damaged or missing.
Spare Parts List:
AA
BB
CC
EE
24W Power Adaptor
X1
7054DD
12" Linking Cord
X1
7053CC
Mounting Clip
X2
4848MC
Dry Wall Screw
X2
4848WS
24W
Plastic Connector
X1
7053PC
A
A
EE
DD
TROUBLESHOOTING
CARE AND MAINTENANCE
● Your fixture is made from quality materials that will last for many years with minimum care. When cleaning, make sure
you have unplugged your fixture, and have allowed sufficient time for the fixture to cool to room temperature. You
should clean the housing and lense using a damp soft cloth. You should plug your fixture back in only after the fixture
has thoroughly dried.
If the light doesn't come on:
1. Check if power supply is on.
2. Check power adaptor.
3. Test or replace switch.
B