
Installation & Assembly

Turn on the power at fuse or circuit box.
Turn off the power at fuse or circuit box.
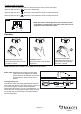
Linking multiple fixtures:
Surface mounted installation:
Recessed mounted installation:
1. The combined wattage of multiple light fixtures per run should not exceed the power rating of the driver (maximum
36W or 48W).
2. A maximum distance of 12˝ between light fixtures should be allowed for linking cord. Install each light fixture or sensor
control by following steps 2-4 of surface installation or steps 2-3 of recessed installation. Once installed, connect cords
and follow step 6 of surface installation. (See Fig. 7-8)
160225
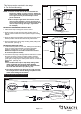
48W Power Supply Box
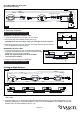
B: Recessed Installation:
2-3/8"
MOUNTING THE SENSOR CONTROL UNIT:
1. Locate desired position for puck light or sensor control.
2. Drill a 2-3/8" hole in the desired location.(See Fig.5)
CAUTION: If the hole is too big or small, the puck light cannot be installed.
3. Remove the lamp housing from puck light. Then feed codes through the hole and
push the light into the hole.(See Fig.6)
MOUNTING THE PUCK LIGHT:
4. Locate desired position for next unit, making sure the linking
plugs can reach (approximately 12" apart is standard spacing).
Repeat step 2-3 for puck light installation.
NOTE: The adjacent plugs of two units should be
reversed (male to female).
5. Connect cords follow step 6 of A installation .
Cabinet
Hole
Direct Wire 48W Power Supply Box
(Purchased Separately)
Page 3 / 5
Fig.7
Fig.8
Sensor Control
Fig.6
Fig.5
Fig.4b
Female Plug
Light Fixture Unit
Sensor Control Unit
Cable Clip
Cable Clip
Connector
Male Plug
Conduit