
Installation Sheet

Page 2 / 6
180720
Installation Steps
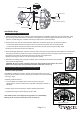
1. Install the mounting strip to the outlet box with the stamped word “FRONT” facing away from the outlet box, using
two mounting screws that best fit the outlet box. Back plate should sit flush against wall surface when secured.
(Choose one matching pair of suitable mounting screws from the 3 pairs provided)
2. Pull out the source wires from the outlet box. Make wire connections using wire connectors as follows:
---Connect the black wire from the fixture to the “hot” wire from the power source. (usually black)
---Connect the white wire from the fixture to the neutral wire from the power source (usually white).
Carefully tuck the wires back into the outlet box.
3. Place fixture light against the outlet box, insert the fixture mounting screw through the fixture light hole, thread fixture
mounting screw into the center hole of the mounting strip. Tighten the fixture mounting screw securely. Push the
decorative cover firmly into the fixture mounting screw hole on the light fixture.
▲ When mounting to a wall, the “UP” arrow must point upward.
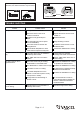
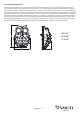
4. With silicone caulking compound (not included), caulk completely around where the back plate
of the fixture the wall surface.
CAUTION: Be sure to caulk completely where the plate meets the wall surface to prevent
water from seeping into the light fixture (C)and/or outlet box ( See Fig 1).
Turn off the power at fuse or circuit box.
Turn on the power at the main fuse or circuit breaker box.
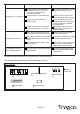
Mounting Strip
Outlet Box
Wire Connector(G)
Mounting Screw
FRONT
Fixture Mounting Screw
Decorative cover
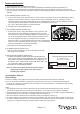
Function and operation
Note:Before operating the function, please open the decorative cover of the
light body at the bottom, and then recovery the decorative cover after operating.
Sensitivity of Motion Sensor:
1. You can adjust the sensitivity of the motion sensor by using the
“SENSITIVITY” selector located on the right side of the bottom surface of
light body.
2. Adjust motion sensor sensitivity to achieve desired performance.
3. Approximate range for each setting from 5ft to 40ft.
Note: When power is first applied, the light will be on immediately.
Waiting for 20 seconds to allow the sensor to warm up.
Decorative Cover
Fig.3
TIME
3MIN
TEST
OFF PC
5S
AUTO
SENSITIVITY
Decorative Cover
Fig. 2
(See Fig.2 Fig.3)
Fig.1