
Installation Guide


130828
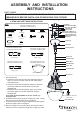
Fig. 2
Outlet Box
Support Brace
Canopy
Coupling Kit
5. Attach the mounting strap to outlet box by using two mounting
screws.
6. Pull out the outlet wires and the house grounding wire from the
outlet box. Make wire connections using the wire nuts:
---The black wire from fixture to the black wire from power
source.
---The white wire from fixture to the white wire from power
source.
---Attach the fixture grounding wire to the mounting strap with
the green grounding screw. Then connect it to the house
grounding wire with the wire nut.
Carefully put the wires back into the outlet box.
7. Attach the canopy to the mounting strap, and secure it with
collar.
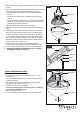
8. Assembly for main fixture with glass shade. Note that top,
inner rim of glass shade has three slots. To lock the glass
shade to main fixture, align the three bumps on outside rim
of main fixture with three slots on inner rim of glass shade
and carefully raise glass shade into main fixture. Hold and
twist glass shade counterclockwise until the glass shade is
firmly locked in place. (See Fig. 1)
9. Install a bulb (not included). See relamping label at
socket area or packaging for maximum allowed wattage.
10. Turn on the power at the main fuse or circuit breaker box.
11. Angled mounting recommended for a vaulted
or angled ceiling. (See Fig. 2)
Slot
Main Fixture
Glass Shade
Bump
Fig. 1
How to Replace the bulb:
1. Turn OFF the electric power at the main fuse or circuit
breaker box.
2. Allow the bulb and fixture to cool down completely before
relamping the bulb.
3. Lift and twist glass shade clockwise, remove the glass
shade from main fixture. (See Fig. 3)
4. Install the new bulb into the socket.
Note: See relamping label at socket area or packaging
for maximum allowed wattage.
5. Restore the glass shade.
6. Turn on the power at the main fuse or circuit breaker box.
Fig. 3
Glass Shade
Slot
Main Fixture