
Installation Guide
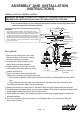

Fixture Wire
Chain
Mounting Screw
Nipple(-b)
Fixture Grounding Wire
Collar
Top Loop
Canopy
Mounting Strap
Green Grounding Screw
Hex Nut
Wire Nut
Washer
Outlet Box
Nipple(-a)
Washer
Grounding Pad
Loop
Hex Nut
House Grounding Wire
Loop Lock
Loop Lock
Loop
1. Take out the loop, grounding pad and washer from
the hardware package for Mini Chandelier.
2. Adjust the hex nut on nipple(-a) to make a length of
1/2" from the top of nipple(-a) to the top of the hex
nut. (See Fig.1)
3. Attach a washer and the grounding pad to the hex
nut on nipple(-a), then secure them with the loop.
4. Choose the length of the chain you need, then
weave the fixture wire and the fixture grounding
wire through the chain. Then connect one end of
the chain with the loop by using one loop lock.
5. Secure the top loop to nipple(-b).
6. Thread the fixture wire and fixture grounding wire
through the collar, canopy, top loop, nipple(-b) and
mounting strap.
7. Connect the other end of the chain with the top loop
by using the other loop lock.
8. Pull out the outlet wires and the house grounding
wire from the outlet box. Make wire connections
using the wire nuts:
---The smooth wire (marked) from the fixture to the
black wire from the power source.
---The ridged wire (unmarked) from the fixture to
the white wire from the power source.
---Attach the fixture grounding wire to the mounting
strap with the green grounding screw. Then
connect it to the house grounding wire with a
wire nut.
Carefully put the wires back into the outlet box.
9. Attach the canopy to the mounting strap by inserting
the top loop, then secure it with the collar.
10. Repeat the steps 6~8 for Light Kit.
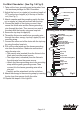
For Mini Chandelier: (See Fig.1 & Fig.2)
Fig.2
Fig.1
Mounting Parts for Mini Chandelier
Nipple(-a)
Fixture
1/2"
Page 2 / 2
F A N C O
091230