
Use and Care Manual


Tighten blades to blade brackets
by using blade screws and
washers.
Make sure the wires of the fan light
in the switch box are capped with
wire connector. Secure the switch
box cover into switch box with the
switch box cover screws.
To install the fan light, skip this
step and proceed to Fig.13.
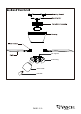
Remove the motor screws and
washers from hang motor assembly
first. Secure the blade brackets to
the motor with motor screws and
washers.
Attach the mounting bar to mounting
bracket with metal washers and hex
nuts by hand and then free your hands
to secure the hex nuts by spanner.
There are four mounting bracket
screws and lock washers. Remove
two screws and lock washers from
the mounting bracket (one from
each side) and loosen the other
two remaining screws. Align the
"L shaped" slots of the housing
with the two remaining screws
on the mounting bracket and push
the housing upwards to engage the
slots and turn clockwise to lock in
place. Tighten the screws and
install the other two mounting
bracket screws and lock washers which were removed
before into the remaining holes of the housing and tighten.
Washer
Blade Bracket
Motor Screw
Fig.11
Blade Bracket
Washer
Blade
Blade Screw
Switch Box Cover
Switch Box Cover Screw
Metal
Washer
Hex Nut
Fig.8
Mounting Bracket
Mounting
Bar
Remove screws from fan light first, then connect
the white (neutral) wire from the fan light to white
(neutral) wire from switch box with a wire connector,
connect the black (hot) wire from fan light to blue
(hot) wire from switch box with a wire connector.
Carefully put the wires into the switch box, then attach
the fan light into the switch box with the fan light screws.
Remove three socket rings from the fan light for later use.
Fan Light
Fig.13
Fan Light
Screw
Wire
Connector
Switch Box
Fan Light
Socket Ring
Switch Box
Fig.14
Fig.9
Mounting Bracket
Screw
Lock Washer
Housing
Fig.10
Fig.12
PAGE: 6 / 9
231101
Install fan light