
Installation Sheet


PAGE: 7 / 10
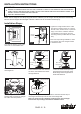
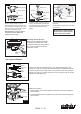
Slide the canopy up to ceiling and over
the two canopy screws on hanger
bracket. Rotate canopy clockwise, next,
while holding the canopy with one hand,
slide the canopy cover over the screws
and rotate clockwise until tight.
Note: Adjust the canopy screws as
necessary until the canopy and
canopy cover are snug.
Fig.11
Canopy Screw
Hanger Bracket
Canopy
Canopy Cover
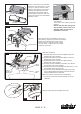
NOTE: Before installing blade
brackets to the motor, please
remove the plastic inserts.
Remove the motor screws from fan motor
assembly.
Secure blade brackets to the motor with
motor screws.
Fig.12
Blade Screw
Washer
Blade Bracket
Blade
Decorative
Plate
Fig.13
Motor Screw
Blade Bracket
Decorative
Plate
Plastic Insert
Thread the blade screws through the
washer, blade bracket and blade into
the decorative plate. Tighten all blade
screws securely. Repeat to other
blades.
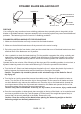
Fan Light Installation:
Hex Nut
Washer
Switch Box
Cover
Plug
Fan Light
Nipple
Fig.15
Remove the plug from the switch box cover. Attach the fan light to the
switch box cover by thread the fan light wires (black and white) and rotate
nipple through the hole of switch box cover and then screw them onto the
switch box cover by nut & lock washer. Be sure it is tight enough to prevent
light kit from vibrating loose.
Assembly without fan light
Make sure the lead wire of fan light
in switch box is sealed with a wire
connector exactly. Secure the switch
box cover into switch box with the
switch box screws.
Switch Box
Screw
Fig.14
Make wire connection:
-- connect the blue wire from the switch box to black wire from the fan light with
wire connector.
-- connect the white wire from the switch box to white wire from the fan light with
wire connector.
Fan Light
Wire Connector
Fig.16
Switch Box
F A N C O
181128