
Installation Sheet

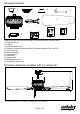


Tighten blades to blade holders by
using blade screws and washers.
NOTE: Before installing blade
holders to the motor, please
remove the plastic inserts
Secure blade holders to the motor with
motor screws and washers.
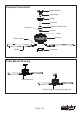
Assembly without fan light
Make sure the lead wire of fan light
in switch box is sealed with a wire
connector exactly. Secure the switch
box cover with the switch box screws.
Plastic Insert
Motor Screw
Blade Holder
Connect the two terminals respectively
from the motor and the switch box.
Switch Box
Attach the rubber clip to cover the slot.
Fig.14.
Slot
Rubber Clip
Fig.10
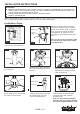
Attach the loop at the end of the safety cable
to the ceiling surface, then secure it with a flat
washer and dry wall screw. Make sure the flat
washer and dry wall screw are covered by the
fan canopy.
Flat Washer
Safety Cable
Dry Wall Screw
Ceiling
Hanger Bracket
Ceiling Joist
Wood Member
(2" x 4" Approx.)
Junction Box
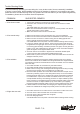
1).The fan switch can switch advances
to a new position whenever the switch
is pulled.The sequence of position is
OFF-HI-MED-LOW.
2).The slide switch sets direction of fan
rotation.Push the slide switch down
for" Forward" and up for "Reverse".
Fan Switch
Slide Switch
Reverse
Forward
Fig.18
Fig.15.
Blue
Green (Ground)
Fig.9
Make wires connections:
Measure the length of wire that you need.
1). The motor white wire to the white wire from the outlet box with a wire connector.
2). The motor black wire and blue wire to the black wire from the outlet box with
a wire connector.
3). The ground wires from the downrod and the hanger bracket to the ground wire
from the outlet box with a wire connector.
*** After making the wire connections, the wires should be spread apart with the
grounded conductor and the equipment-grounding conductor on one side of the
outlet box and the ungrounded conductor on the other side of the outlet box.
*** After the splices have been made, they should be turned upward and pushed
carefully up into the outlet box.
Screw
Canopy
Fig.11
Secure the canopy to hanger
bracket with screws.
Blade Screw
Washer
Blade Holder
Blade
Fig.12
Fig.13
Fig.17
Turn ON the electric power at the
main fuse or circuit breaker box.
Fig.16.
Switch Box
Screw
F A N C O
171120
PAGE: 6 / 8