
Installation Sheet


PAGE:7/ 8
Turn ON the electric circuit at the
main fuse or circuit breaker box.
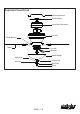
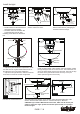
Fig.18
Fan Speed Pull
Chain
Fan Light Pull Chain
Reverse
Forward
Reverse Switch
Fig.19-a
The slide switch sets direction of fan rotation. Select the desired direction of fan
rotation. Push the slide switch down for " Forward" and up for "Reverse".
CAUTION: If you install a Wall Control for this fan, make sure to use the pull
chains to select the "high" position for the fan speed and the "on" position
for the fan light.
Install the glass shade, rubber washer and metal washer upward
through the nipple and secure with hex nut. Then attach the end
cap to the glass shade and secure it with finial. Take care to align
the holes on the glass shade and the end cap, so the pull
chains pass through and move freely.
Glass Shade
Fan Light
Hex Nut
Metal Pad
Rubber Pad
End Cap
Finial
Fig.17
Fig.19-b
Slide Switch
Reverse
Forward
Hole
Fan Light
Knob
Switch Box
Glass Shade
Chain
Fig.16
*** Adjust the glass shade and cap direction, make
sure that the hole of glass shade and the knob of
the switch box are in the same straight line.
*** Adjust the fan light direction, make sure that the
chain does not touch the sockets or light bulb.
F A N C O
140819
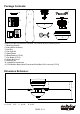
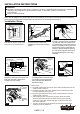
Fig.13
Install bulbs (included). See relamping
label at socket area or packaging for
maximum allowed wattage.
Connect wires:
--- The blue wire from the switch box to
the black wire from fan light.
--- The white wire from the switch box
to the white wire from fan light.
Carefully put the wires into the switch
box.
Wire Nut
Switch Box
Switch Box Screw
Fan Light
Fig.14
Install the fan light onto the switch box
with the switch box srews.
Switch Box
Switch Box Screw
Fan Light
Fig.15
E26 medium base spiral
fluorescent Bulb
(Max.13W, incluced)
Install fan light