
Technical data


Once the terminal passes its self-test, you are ready to perform setup
operations.
5.1 Perform Setup Operations
Setup instructions for terminals vary according to model or according to
which read-only memory (ROM) is installed in the terminal. Be sure to:
• Read the documentation provided with your terminal.
• Follow the setup instructions for your terminal.
NOTE: A new terminal from Digital has the baud rate set to 9600. If your
terminal is new and you want to use that rate, you can skip the baud rate
setup instructions.
If you have a dual-host system, you can use one terminal with dual sessions
instead of two terminals. See your terminal documentation for instructions.
Once you test the terminal and perform setup operations, you are ready to
connect the terminal to your system.
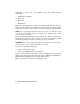
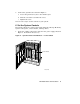
5.2 Connect the Terminal to the System
You will attach one end of a cable to the console module and the other end
of the cable to a communication port in the back of the terminal.
• The console module is on the front of the system and covers backplane
slots 1 through 5.
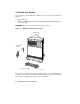
• The port on the back of the terminal varies with the type of terminal.
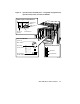
Refer to the instructions that follow to connect a VT300-series or VT400-
series terminal to a 120-volt or 240-volt system.
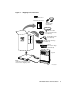
1. Turn off the terminal.
2. Find the console terminal cable. It is labeled 17–01364–02 and has a
DEC–423 modular plug on each end.
3. Connect the terminal cable to the DEC–423 modular jack labeled 1 on
the rear of the terminal, according to the instructions in your terminal
installation guide.
VAX 4000 Model 300 Installation 7