User Guide Vax Careline: (UK) 0844 412 8455 (ROI) 1-800 928 308 Carpet washer Powermax Get cleaning... What’s your Vax model number? (Located on the flap of the packaging) e.g. V R S 1 7 W What’s your serial number? – (Located on the base of the machine) – – – – Note these down in case you need them in future. Please keep instructions for further use. vax.co.
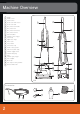
----------- Machine Overview 1 2 3 4 5 6 7 8 9 10 11 12 13 14 15 16 17 18 19 20 21 22 23 24 25 26 Handle Handle screw On/off switch Clean water tank release Clean water tank Dirty water tank handle Dirty water tank Dirty water tank release Dirty water tank lid Static brushbar Solution release trigger Cord wrap Upper hose wrap Power cord Carry handle Cord release clip Handle release pedal Lower hose/tool caddy Solution supply socket Solution tube plug Hose Solution spray trigger Hose adaptor Wash tool Vax
General Safety Information This carpet washer is intended for household use only and NOT for commercial or industrial use. 17. PLEASE KEEP INSTRUCTIONS FOR FURTHER USE. 18. 19. 20. When using the carpet washer, basic safety precautions should always be observed, including the following: 21. 1. 2. 3. 4. 5. 6. 7. 8. 9. 10. 11. 12. 13. 14. 15. 16. Do not leave the carpet washer unattended when plugged in. Unplug the appliance from the socket when not in use.
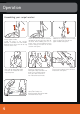
- Operation Assembling your carpet washer 2 ! 1 Attach upper handle Stand the base in the upright position. Assemble the mid section onto the base, taking care not to trap internal mains wire. Insert the two nuts into the recesses located on the left and right sides of the base. While holding the nuts in place, insert the two medium length screws through the front of the mid section and tighten. 1 Align tabs on hose/tool caddy with slots on midsection and snap into place.
Operation Detach the hose adaptor from the end of the hose and slide it onto the adaptor post. Fit the wash tool into the middle slot of the hose/tool caddy. Wrap hose round the upper hose wrap, anti-clockwise, twice, ensuring the hose is secured in the hose clips. Lock the attachment end of the hose into place by clipping into the right slot on the lower tool caddy. vax.co.uk Clip the adaptor end of the hose into the left slot on the hose/tool caddy.
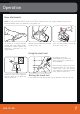
- Operation Filling the clean water tank IMPORTANT: Turn off when emptying and filling the clean water tank. 1 2 Remove clean water tank from the carpet washer. Unscrew the filler/measure cap from the rear of the clean water tank. Fill the bottle cap or measure cap 3 times with Vax carpet cleaning solution and pour into the tank. Fill the remainder of the clean water tank with warm (max 40°C) tap water. Replace the cap.
Operation Hose attachments NOTE: DO NOT OVERSATURATE YOUR UPHOLSTERY. For best results use steady, moderate, forward and backward motion. Make sure upholstery is dry before use. Put cleaner in its upright position. Remove tools from storage caddy. Assemble as shown. Connect the upholstery attachment to the trigger adapter. Remove the tank door from the top of the dirty water tank. Insert the hose adapter into the top of the dirty water tank. Using the wash tool Turn power switch on.
- Operation Carry Handle NOTE: Do not transport the carpet washer with either the clean or dirty water tanks full. NOTE: If the hose attachment door is not replaced, there will be no suction through the nozzle and the unit will not operate properly. Grasp the handle on the back of the unit to move unit from room to room. Emptying the dirty water tank NOTE: The float in your machine is the orange piece in the dirty water tank lid, which will shut off the suction when the dirty water tank is full.
Operation Cleaning the dirty water tank NOTE: Do not use any chemicals in the cleaning process. Rinse the dirty water tank and filter thoroughly with warm water. You should allow them to dry fully before replacing them on your cleaner to prevent mildew.
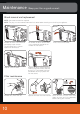
- Maintenance (Keep your Vax as good as new) Brush removal and replacement NOTE: Crosshead screwdriver required. NOTE: The plug must be removed from electrical socket before cleaning or maintaining the appliance. Remove the water tank switch off and unplug carpet washer. Flip the cleaner on its side to expose the nozzle base. To remove the brush access cover, use a crosshead screwdriver to remove the two screws. Replace static brushbar.
FAQs WARNING: to reduce the risk of personal injury, unplug the carpet washer before performing maintenance/troubleshooting checks. Why won’t the cleaner run? • It may not be plugged into the electrical socket correctly; ensure that the plug is pushed in securely. Why is dust escaping from the cleaner? • The dirty water tank may be full. Switch off and unplug cleaner. Empty dirty water tank as shown on page 8.
- Other Information UK Service & Help Any queries or concerns about using your Vax, simply visit; vax.co.uk/support – vaxireland.ie or call the Vax Careline. Calls are charged at the UK local rate. Please make a note of the serial number and model number of the vacuum cleaner before calling. Vax Careline: (UK) 0844 412 8455 (ROI) 1-800 928 308 Monday-Friday 8.30am to 6.30pm Saturday-Sunday 9.00am to 5.00pm Consumables To purchase spares and accessories, please visit vax.co.
Notes vax.co.
- Notes 14
Notes vax.co.
--- Vax Ltd., Kingswood Road, Hampton Lovett, Droitwich, Worcestershire, WR9 OQH, UK email: info@vax.co.uk - website: vax.co.uk Version 1.