
Technical data


VAX/VAXserver 4000-300, -400, and -500 Conversion
5.5 Installing the Kit
5.5 Installing the Kit
If the conversion kit contains a backplane, then go to Section 5.6 and proceed
with the system upgrade; otherwise, start with step 1.
To install the conversion kit:
1. Unlock the front door by turning the front door key switch to the bottom
position. Open both access doors simultaneously. Turn off the power switch
on the power supply.
2. Turn off the system power to any expander boxes connected to the system.
Caution
Wear an antistatic wrist strap and use an antistatic mat during module
handling to prevent static discharge and damage to modules. The wrist
strap and mat are in the antistatic kit in the Digital Services toolkit.
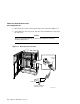
3. Open the H3604 console module by turning the ¼-turn screws.
4. Swing the hinged panel to the left. Note the position of the internal cables
connected to the H3604 module. Carefully disconnect the internal cables.
5. Remove the old CPU module. Remove the L4001 memory modules, if
applicable. Install the new CPU module. Install the new L4001 memory
modules, if applicable.
6. Reconnect the internal cables to the H3604 console module. Close and lock
the H3604 console modules.
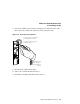
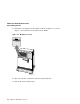
7. Attach the new CPU label and memory labels to the H3604 console module
panel as shown in Figure 5–1. The CPU label goes on the left-most side of
the H3604. The memory labels go to the right side.
5–4 VAX/VAXserver 4000-300, -400, and -500 Conversion