
Technical data


VAXserver/MicroVAX 3500/3800 Conversion
2.4 Installing the Kit
23. Attach the new CPU module label to the CPU I/O panel as shown in
Figure 1–4.
24. Install the memory module covers.
25. Attach the new memory module labels to the memory module covers as
shown in Figure 1–4.
26. Reconnect the cables to the CPU I/O panel.
27. Reinstall the OCP.
28. Reinstall the media faceplate.
29. If the external DSSI cable is used in the system, then reconnect it to the
external connector on the media faceplate.
30. Reinstall the front panel.
31. Run diagnostics to verify system operation.
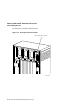
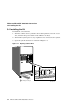
32. Place the new serial label over the existing serial label as shown in
Figure 2–7 for pedestal systems.
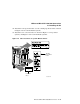
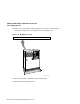
33. Place the new JTT label, P/N 36-33180-18, on the system or place over
existing label, if it is present. The JTT label placement is shown in
Figure 1–5 for a pedestal system, and Figure 1–6 for a rack-mountable
system.
Note
Two labels are shipped with the conversion kit. Install the JTT label,
P/N 36-33180-18, for a BA213 enclosure.
VAXserver/MicroVAX 3500/3800 Conversion 2–11