
Technical data


VAXserver/MicroVAX 3500/3800 Conversion
2.4 Installing the Kit
12. Remove the module cover from the KFQSA module. Remove the module
covers from the memory slots.
13. Disconnect the socket end of the internal DSSI cable that is connected to
the KFQSA module.
14. Reroute the cable up through the notch at the left-front of the mass storage
shelf.
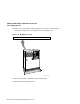
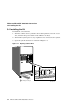
15. Run the cable down through the space to the left of the tape drive as shown
in Figure 2–6.
Caution
Make sure the excess cable does not touch the ISE when it is installed.
Otherwise, the shock-absorbing function of the mounting bracket will
be impeded.
16. Connect the DSSI internal cable into the outer connector (J2) on the new
CPU module.
17. Install the DSSI handle (P/N 70-26020-01) above the KFQSA module by
connecting the internal cable on the handle to the KFQSA module. The
DSSI handle is included in the conversion kit.
If you are not connecting the DSSI handle to external drives, then connect
a DSSI external terminator (P/N 12-29258-01) to the handle’s outer
connector.
18. If memory needs to be upgraded, then remove the 50-pin daisychain
memory cable that connects the memory modules and the CPU module.
19. Remove old memory modules and install the new memory modules.
A 3-connector memory cable is provided in the memory kit for a 2-memory
module connection.
20. Connect the appropriate memory cable from the CPU inner connector to all
the memory modules.
The new CPU module has two internal flat cables and one round cable that
must be connected.
21. Connect the CPU I/O panel cable to the H3602 CPU I/O panel.
VAXserver/MicroVAX 3500/3800 Conversion 2–9