Vax careline 0870 6061248 Vax model number: V-028CC AAA instruction manual Carpet washer SOLUTION www.vax.co.uk Please read carefully before using this cleaner. Always fully extend the mains cable before use. Retain for future reference.
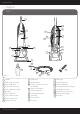
www.vax.co.uk 1. Diagram V-028CC 1 20 19 2 10 18 11 3 12 13 4 17 5 9 16 8 14 15 7 6 22 AAA 23 27 21 24 SOLUTION Fig.
Vax Careline 0870 606 1248 2. Safety Information FOR HOUSEHOLD USE ONLY. When using the vacuum cleaner, basic safety precautions should always be observed, including the following: 21. Using improper voltage may result in damage to the motor and possible injury to the user. The correct voltage is listed on the rating label. 22. A hazard may occur if the carpet washer runs over the power supply cord. 1. Do not leave the carpet washer unattended when plugged in. Unplug it from socket when not in use. 23.
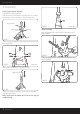
www.vax.co.uk 3. Assembly Putting your cleaner together Stand base in upright position. Push mid-section onto base by aligning tabs on inside of mid-section with the pockets on the base (Fig.3/1) mid-section Fig.3/4 tabs back view Caddy Assembly pockets Align tool caddy with screw holes on mid-section and base (Fig.3/5). base Fig.3/1 cord Insert 4 lower handle/tool caddy screws and tighten until secure (Fig.3/2). Fig.3/5 Insert the three (3) tool caddy screws and tighten until secure (Fig.3/6).
Vax Careline 0870 606 1248 Cord Storage hose clips Wrap cord around upper and lower cord wraps (Fig.3/7). Clip plug to cord to secure for storage. A upper cord wrap lower cord wrap with quick cord release B Fig.3/10 Continue wrapping hose clockwise, aligning hose into groove on the bottom hose clip (Fig.3/11). Fig.3/7 Tool Storage Place Upholstery/Stair hose adaptor, Upholstery/Stair hose, and the Upholstery/Stair attachment into their storing locations (Fig.3/8).
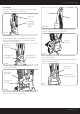
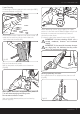
www.vax.co.uk 4. Operation Preparing the Carpet ! IMPORTANT: Do not use the carpet washer as a dry vacuum. How to Operate Grasp clean water tank under handle while pressing clean water tank latch. Tilt clean water tank away from cleaner and remove (Fig.4/1). 1. Vacuum carpet thoroughly. Use a vacuum cleaner with a revolving brushbar for best results. clean water tank latch 2. Remove as much furniture from the room as possible.
Vax Careline 0870 606 1248 Carpet Cleaning Fill remainder of clean water tank with warm (max 50ºC) tap water. Replace cap (Fig.4/4). Fig.4/7 Fig.4/4 Place bottom of clean water tank into carpet washer and rotate top into position until the clean water tank. Latch snaps into place (Fig.4/5). Whilst depressing solution spray trigger, push carpet washer in a forwards motion. Release trigger and pull unit backwards in same path to remove dirty water and solution from the carpet.
www.vax.co.uk Remove the dirty water tank door from the top of the dirty water tank (Fig.4/10). ! IMPORTANT: For best cleaning results use steady, moderate, forward and backward motion. Make sure upholstery is dry before use. NOTE: If the dirty water tank door is not replaced, there will be no suction through the nozzle and the unit will not operate properly. Fig.4/10 IInsert the up-holstery/stair hose adaptor into the opening on top of the dirty water tank (Fig.4/11). Fig.
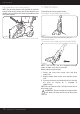
Vax Careline 0870 606 1248 Remove filter from rear of dirty water tank lid (Fig.4/18) latch handle Fig.4/14 Grasp handle and pull tank out of base (Fig.4/15). Fig.4/18 Rinse dirty water tank and filter with warm tap water. Wipe and let dry thoroughly before storing to prevent mildew from forming (Fig.4/19). Fig.4/15 Remove dirty water tank lid (Fig.4/16). Fig.4/19 NOTE: Do not use any chemicals when cleaning.
www.vax.co.uk Push handle down until it latches (Fig.4/21). NOTE: Do not store cleaner with solution in reservoir or dirty water in dirty water tank. Mineral deposits and mildew can form which will affect the performance of the carpet washer. Fig.4/21 5. Maintenance Transporting & storing carpet washer Put handle in upright locked position (Fig.5/1). Fig.5/1 Turn unit off. Store cord and above floor cleaning attachments if used. Tilt unit back on rear wheels and push forward (Fig.5/2). Fig.
Vax Careline 0870 606 1248 6. Troubleshooting ! 7. UK Service & Help WARNING: To reduce the risk of personal injury, unplug the vacuum cleaner before performing maintenance or troubleshooting checks. PROBLEM: The cleaner won't run. Cause: Not properly plugged into electrical outlet. Solution: Plug in firmly. Cause: No electricity in electrical outlet. Solution: Check fuse or breaker. Cause: ON/off switch not turned on. Vax Care 0870 6061248 Monday-Friday 8.30am to 6.30pm Saturday-Sunday 9.
- EEC STATEMENT OF COMPLIANCE Manufacturer/EEC importer: Vax Limited, hereby on our own responsibility, declare that the Vax V-028CC is manufactured in compliance with the following Directives: Safety: 2006/95/EC Low Voltage Directive EMC: 2004/108/EC Electromagnetic Compatibility Directive Waste electrical products should not be disposed of with household waste. Please recycle where facilities exist. Check with your Local Authority or retailer for recycling advice. Vax Ltd.