
User`s guide


Introduction
This section provides an overview of how to program the Adept T1/T2 pendant. You can refer
to the Adept T1 Pendant User’s Guide or Adept T2 Pendant User’s Guide for information on
installing and operating the pendant. For information on programming the MCP, see
Programming the MCP on page 263.
Legacy Issues with the MCP and T1/T2 Pendant
The previous generation of the pendant was called the MCP (manual control pendant). The
code examples shown throughout this section contain references to MCP. The programming
methods and keywords are essentially the same for the MCP and the T1/T2 pendant.
For indicating that a button is active, the T1/T2 pendant uses a different screen technology
than the LEDs on the MCP. In the Adept T1 Pendant User’s Guide or Adept T2 Pendant User’s
Guide, the term "indicator bar" is used to describe this function. For this programming
section, the term LED is used to maintain backwards compatibility with existing code, and
LED and "indicator bar" mean the same thing.
ATTACHing and DETACHing the Pendant
Before an application program can communicate with the pendant, the pendant must first
be ATTACHed using the ATTACH instruction. The logical unit number for the pendant is 1.
The following instruction readies the pendant for communication:
mcp_lun = 1
ATTACH (mcp_lun)
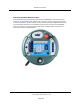
When the pendant is ATTACHed, the USER indicator in the upper left corner of the pendant
touch screen is lit. As with all other devices that are ATTACHed by a program, the pendant
should be DETACHed when the program is finished with the pendant. The following
instruction frees up the pendant:
DETACH (mcp_lun)
When the pendant has been ATTACHed by an application program, the user can interact with
the pendant without selecting manual mode.
As with all I/O devices, the IOSTAT function should be used to check for errors after each I/O
operation.
Introduction
(Undefined variable: Primary.Product_Name_V)Language User's Guide, version
17.x
Page 285