
Owner`s manual

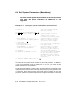


The first phase of verification involves checking the self-test results. When
you power up the system, self-test runs, showing the state of each module
in the XMI card cage. (Entering the INITIALIZE command at the console
prompt also generates self-test.) Example 6-1 shows a self-test of an
upgrade from a VAX 6000 Model 510 to a Model 520. Another processor
has been added. Example 6-2 shows an upgrade using the H9657-CX kit.
NOTE: If you are replacing a single processor, or the boot processor of
a multiprocessor system, and self-test does not display on power-up, the
console baud rate and your terminal baud rate may not be set the same. Hit
the
BREAK
key, which steps the terminalbaud rate in the availableincrements,
until you get the console prompt (>>>). Then type INIT to start self-test.
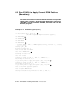
Examine your self-test results. Self-test results differ for the H9657-CX
upgrade at the TYP line where it shows XMI slots 1 and 2 as empty
(see of Example 6–2. The T2019 module actually occupies slot 2, and
its components (heat sinks) protrude into slot 1.
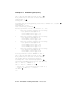
Check the STF line to see that all Model 500 processors and other
modules passed self-test.
Check the ETF line to see that all CPUs passed the extended test. For
Model 500 systems, the multiprocessor tests are run every time self-test
runs.
Check the XBI lines for self-test results for VAXBI modules.
The system serial number error message appears, indicating that the
processors do not have the system serial number in their EEPROMs.
If a KA65A processor module fails self-test, as shown by a minus (–) rather
than a plus in the STF or ETF rows, the most likely problem is that the
module is improperly seated in the XMI slot. Power the system down,
reseat the failed module, and power the system up again.
If the KA65A module still fails self-test, it should probably be replaced.
You can further isolate the problem by looking at the KA65A LEDs. See
Appendix B for a discussion of the KA65A LEDs.
Verifying the System 6–7