
User`s manual


maximum luminance differentiation between background
and inspected object.
-
Briefly, the SLS staging and setup procedure when using
bright backlighting involves these main steps:
1. Place one or two sheets of white paper over the
background light source, and place the inspected object
on top of the paper.
2. Select an appropriate configuration record from the
Configuration Menu and download the configuration to
the SLS using the Send option.
3. Select the View Image option in the Configuration
Menu.
4. Set the lighting compensation to “On.”
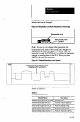
5. Turn on the light source, then position the object and
focus the SL.S to obtain the best image, such as the one
in Figure 6.18.
Figure 6.18 Ob@t Image Wi “Normal” Background luminance
Inspected object \L
“Normal” background
hUiUaIlcp
6. After a few moments, set the lighting compensation to
“Off.” The image should remain as shown in
Figure 6.18 (except “On” changes to “Off.“).
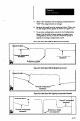
7. Remove the paper from under the inspected object.
When you do, the background luminance should
saturate, as shown in Figure 6.19 on page 624.
8. To save the configuration, return to the Configuration
Menu. Use the Add or Insert option to create a new
configuration record, or use the Overwrite option to
update an existing configuration record.
Note that the inspected object in Figure 6.19 on page 6-24
has a higher “amplitude” than in Figure 6.18, above. This
enhances edge detection.