
User`s manual


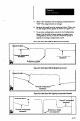


Press the ESC key, then
press the ENTER key to
save the configuration
record.
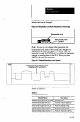
When you press the ESC key, the “Save” menu option is
highlighted.
Select the Send option to
When you press the ENTER key, the “taught variables
send the new configuration
to the SM.
don’t match” message appears.
Select “Yes,” then press the This downloads the new configuration to the SLS with the
ENTER key.
new taught variables.
This completes the configuration procedure for the binary
analysisfunctions.
Disable Automatic Lighting Compensation
(Series B SLS Only)
You can selectively enable or disable the automatic lighting
compensation function in the SLS in order to achieve more
control in special lighting situations. Generally, you would
first enable the lighting compensation long enough to
permit it to adjust to the “normal” luminance level, then
disable it to prevent further automatic adjustments from
occurring when intended (or unintended) changes occur in
the background luminance level.
Here are some lighting situations in which the capability of
disabling lighting compensation could be used effectively:
Bright backlighting - In compensating for changes in
background light levels, automatic lighting compensation
always attempts to prevent the background luminance in the
image from reaching saturation. This, however, may
prevent the SLS from maximizing the difference between
the background luminance and the inspected object’s
luminance and, as a consequence, achieving the maximum
edge detection capability.
Furthermore, if the brightness level of the background light
source exceeds the capability of the lighting compensation
function, the result may be instability in the processed
image. This could be a problem for applications using a
bright background lighting source.
When lighting compensation is disabled, however, the
background luminance can reach saturation and ensure the
-
-
-
‘Not available in Main Menu View Image option.
6-22