
User`s manual


COnfiCJU~tiOn &?nU
When you select the Configure Option in the Main menu,
Options
the Configuration Menu appears, the top half of which is
shown in Figure 5.1. Note that the Configuration Menu
options are displayed across the upper part of the screen.
You can highlight a menu option by typing its initial letter,
by pressing the right (or left) arrow key, or by pressing the
SPACE BAR (or BACKSPACE) key. You can select an
option by pressing the ENTER key. You can deselect a
selected option by pressing the ESC key.
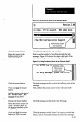
Figure 5.1 Configuration Menu Options
Smart Linear Sensor
Configuration Henu
Version 2.M
m Insert Delete Hodify Overwrite Send Report View Image Utilities
Sibley
Initially, the area under “Description” is empty; however, in
the example shown in Figure 5.1, the Description area lists
the names (“descriptions”) of three configuration records
that are used in the explanations of the menu option
functions below. Each configuration record shows the time
and date that it was last saved.
Here are the functions of the configuration menu options:
1. Add - Select this option to create a new configuration
record. If you save the new record, its description is
added below the last record listed under “Description”
(in Figure 5.1, it would be after the “Check Total Size
of Holes” record).
2. Insert - Select this option to create a new configuration
record. If you save the new record, its description is
-
inserted above the highlighted record under
“Description” (above the “Locate Left Edge of Part”
record in the example in Figure 5.1).
3. Delete - Select this option to delete the highlighted
configuration record. When you press the ENTER key
to delete the record, a message asks whether you am
sure that you want to delete the record. If not, select
5-2