
User`s manual


Note the column of 12
“DIP” switches.
These 12 “rocker” switches select the SLS analysis
function and operating parameters, including the Remote
Configuration switch.
Press down on the rocker
switch as shown in
Figure 2.2 (page 2-t).
This completes the Remote Configuration switch setting.
Software Installation
Your Action
Comments
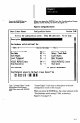
Insert the diskette labeled
“#I” in the disk drive.
Type A:INSTALL or
B:INSTALL at the DOS
prompt, then press the
ENTER key.
This activates the installation program, which creates an
“SLS” directory, then begins loading files into it. When it
finishes installing from diskette #l, a screen prompt asks
you to insert diskette #2. (You can type the “install”
command using uppercase or lowercase.)
The SLS Configuration Support Software is supplied on
two 5.2~inch diskettes and one 3.5inch diskette. Use
whichever diskettes are appropriate for your PC.
Note: Before you install the software, you should make a
copy of the software and use the copy for installation. Refer
to your DOS manual for instructions.
Installing the CSS in your PC is simple and
straightforward. The following steps show you how.
If you are using a 5.2%inch drive, use all of the steps to
install the CSS.
If you are using a 3.5inch drive, the steps are the sa.me,
except that aUfile.s are on one diskette; thus, the
installation continues to completion after you type the
“install” command and press the ENTER key.
Note: The “A:lNSTALL” and “B:lNSTALL” commands
install the CSS in English. To install the CSS in a different
language, such as French, type “A:INSTALL -LF’. Use the
initial letter of the language after the “L” (uppercase or
lowercase).
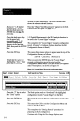
Remove diskette #I when
the screen prompt appears.
Insert the #2 diskette, then
follow the screen prompts.
Remove diskette #2.
The “install” software loads in the remaining files. When it
finishes, a screen message appears.
This completes the CSS installation.
2-5