Vax V-006 D5 BF 7/1/05 12:13 PM Page 1 Vax Careline: 0870 6061248 www.vax.co.uk BAGLESS UPRIGHT VACUUM CLEANER Vax Model Number: V-006U BAGLESS UPRIGHT VACUUM CLEANER Vax Model Number: V-006/V-006B/V-006N Instruction Manual Please read carefully before using this cleaner. Always fully extend the mains cable before use.
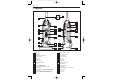
Vax V-006 D5 BF 7/1/05 12:13 PM Page 2 Parts Overview 1. Diagram FRONT BACK 6x 18 9 1 30 29 2 10 3 11 4 12 28 19 20 5 26 13 21 6 27 25 14 7 8 15 22 16 23 17 24 Fig.
Vax V-006 D5 BF 7/1/05 12:13 PM Page 3 Safety Information 2. Safety Information FOR HOUSEHOLD USE ONLY. When using the vacuum cleaner, basic safety precautions should always be observed, including the following: 1. Only use the vacuum cleaner indoors on dry surfaces. 2. Turn off the vacuum cleaner controls before connecting to or disconnecting from the mains supply. 3. Always unplug the vacuum cleaner before connecting or disconnecting the vacuum hose. 4.
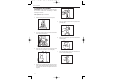
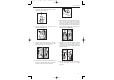
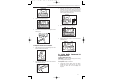
Vax V-006 D5 BF 7/1/05 12:13 PM Page 4 How to Assemble 3. How to Assemble IMPORTANT: Always remove the power plug from the electrical outlet before assembling or before removing accessories. Tool required: Phillips screwdriver. 1. Slide the back panel onto the base (Fig.3/1). Fig.3/4 5. Place the upper handle onto the upright back panel (Fig.3/5). Fig.3/1 2. To secure, insert the two (2) screws into the front of the back panel (Fig.3/2). Fig.3/5 6.
Vax V-006 D5 BF 7/1/05 12:13 PM Page 5 How to Assemble 8. Insert the two (2) screws into the back of the handle and screw them into the tool caddy. Tighten until secure (Fig.3/8). Fig.3/11 Fig.3/8 9. Clip the TurboTool® onto the front of the TurboTool® caddy (Fig.3/9). 12. Attach the tools. Slide the dusting brush onto the post in the upper tool caddy with the bristles facing out (Fig.3/12A).
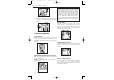
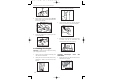
Vax V-006 D5 BF 7/1/05 12:13 PM Page 6 How to Assemble/How to Operate Fig.3/14 15. To secure the dirt container push the top in place, there will be an audible click when it is secure (Fig.3/15). CAUTION: The brushbar continues to rotate while the hose is removed or in use, and at all times while the vacuum cleaner is on. Keep hair, loose clothing, fingers and all parts of the body away from the brush area while the vacuum cleaner is on.
Vax V-006 D5 BF 7/1/05 12:13 PM Page 7 How to Operate/Accessories/Dirt Container: Removal & Replacement A Crevice tool: for crevices, corners and cracks etc. Dusting brush: for delicate surfaces and skirting board. B Stair tool ( V-006U only): for stairs, upholstery and curtains. Twist the head tool for best contact with stair treads and risers (Fig.5/4). C A Fig.4/5 5. Accessories IMPORTANT: The vacuum cleaner must be in the upright position to raise the brushbar.
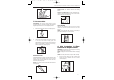
Vax V-006 D5 BF 7/1/05 12:13 PM Page 8 Dirt Container & Filter: Removal & Replacement 2. Remove the dirt container lid by turning it anticlockwise (Fig.6/2). 6. Align slots on the lid with the tabs on the dirt container (Fig.6/6A). Push the lid down and twist clockwise. NOTE: There is a guideline on the back of the dust container lid. Align the line with the arrow on the dirt container and turn clockwise until secure (Fig.6/6B). Fig.6/2 3. Hold the dirt container and grasp the top of the filter.
Vax V-006 D5 BF 7/1/05 12:13 PM Page 9 Rotating Brushbar & Filter: Removal & Replacement/Light Bulb Removal & Replacement 3. With the new belt in place, pull and slide the brushbar into the nozzle, making sure that the end caps are in the correct orientation (Fig.7/6A). Rotate the brushbar manually to make sure the belt is properly aligned (Fig.7/6). Fig.7/1 2. Lift the nozzle guard (Fig.7/2). A Fig.7/6 4. Re-attach the nozzle guard (Fig.7/7) Fig.7/2 3.
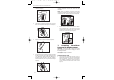
Vax V-006 D5 BF 7/1/05 12:13 PM Page 10 Light Bulb: Removal & Replacement/Clearing Blockages 2. Undo the hose from the back panel dirt tube. Remove any obstruction (Fig.9/2). Fig.8/1 2. Pull the bulb out of the socket gently. Do Not twist the bulb. Gently push the replacement bulb into the socket (Fig.8/2). Fig.9/2 3. Undo the hose from the clear dirt passage window and remove any obstruction (Fig.9/3). Fig.8/2 3. Secure the headlight lens by replacing the two (2) screws (Fig.8/3). Fig.9/3 4.
Vax V-006 D5 BF 7/1/05 12:13 PM Page 11 Clearing Blockages 2. Pivot lowering housing and remove any blockage (Fig.9/6). Fig.9/6 3. To re-assemble, ensure that the tabs are engaged. Pivot the lower housing closed and rotate the locking ring 180º (Fig.9/7). TABS Fig.
Vax V-006 D5 BF 7/1/05 12:13 PM Page 12 Troubleshooting 10. Troubleshooting WARNING: TO REDUCE RISK OF PERSONAL INJURY, UNPLUG VACUUM CLEANER BEFORE SERVICING PROBLEM: Cleaner won’t run Cause: Not properly plugged into electrical outlet. Solution: Plug in firmly. Cause: No electricity in electrical outlet. Solution: Check fuse or breaker. Cause: On/off switch not turned on. Solution: Push on/off switch to on. Cause: Motor thermostat has tripped. Solution: Switch off and unplug cleaner.
Vax V-006 D5 BF 7/1/05 12:13 PM Page 13 Troubleshooting/UK Service & Help/Technical Specification PROBLEM: Air flow restricted with attachment use Cause: Attachment use restricts air flow. Solution: Check attachment. Cause: New carpet debris clogging air path. Solution: Remove obstruction. PROBLEM: Headlight does not work Cause: Bulb has blown. Solution: Refer to page 9 & 10 for fitting information. 11. UK Service & Help Vax Care 0870 6061248 Monday-Friday 9.00am to 5.00pm.
Vax V-006 D5 BF 7/1/05 12:13 PM Page 14 This page has been intentionally left blank.
Vax V-006 D5 BF 7/1/05 12:13 PM Page 15 This page has been intentionally left blank.
Vax V-006 D5 BF 7/1/05 12:13 PM Page 16 EEC STATEMENT OF COMPLIANCE Manufacturer/EEC importer: Vax Limited, hereby on our own responsibility, declare that the V-006 series Bagless Upright Vacuum Cleaners are manufactured in compliance with the following Directives: Safety: 73/23/EEC Low Voltage Directive EMC: 89/336/EEC Electromagnetic Compatibility Directive Waste electrical products should not be disposed of with household waste. Please recycle where facilities exist.