
Installation guide


1. Check the cabinet sides, top, and front and rear doors for damage. If
the cabinet is damaged, do the following:
a. Enter the location and extent of the damage on the LARS report.
b. Notify the customer and your unit manager.
c. Stop unpacking until the customer gives you permission to
continue.
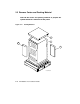
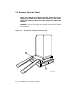
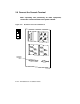
2. Using a 9/16 inch wrench, remove the four bolts and shipping brackets
that hold the cabinet to the pallet (see Figure 2–3, ).
3. Check the leveler feet. They should be in the uppermost position, away
from the floor.
WARNING: Serious personal injury may result if the cabinet is
improperly handled or proper safety conditions are not met. During
the unpacking procedure, personnel should wear safety glasses. Inspect
the ramps, the ramp side rails, and metal hardware for defects described
in the following list.
• Cracks more than 25 percent of the ramp depth, either across or
lengthwise on the ramp.
• Knots or knotholes going through the thickness of the ramp and
greater than 50 percent of the ramp width.
• Loose, missing, or broken ramp side rails.
• Loose, missing, or bent metal hardware. If any of these conditions
exist, DO NOT USE THAT RAMP. Investigate alternate means of
removing the cabinet and/or order a new ramp.
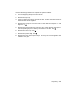
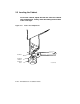
4. Attach the ramps by fitting the prongs into the holes on the front of the
pallet. Place the ramps so that the runners are on the inside. Align
the arrows on the ramps and pallet. See .
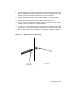
5. With two people working together, slowly roll the cabinet off the pallet
and down the ramps.
6. Move the cabinet into position.
Unpacking 2–9