
Installation guide


For all system configurations, expansion will be to the right of the system
cabinet.
1. Refer to the VAXBI Expander Cabinet Installation Guide for unpacking
instructions. Allow for adequate work space when you position the
expander cabinet next to the system cabinet.
2. Perform an orderly shutdown of the system.
3. Turn the upper key switch on the front control panel to the Off position.
4. Pull the H405 circuit breaker to the Off position.
5. Open the front door.
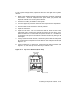
6. Open the rear door. You can remove the door for easier access to the
side panel bolts. Remove the ground strap from the rear door; use a
3/8 inch nutdriver to remove the strap from the door or a screwdriver
to remove the strap from the cabinet. Remove the door by lifting it off
the hinges.
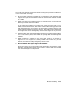
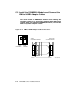
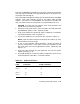
7. Using a 7/16 inch socket wrench, remove the system cabinet’s side panel
by removing the 12 kepnuts from the bolts on the side panel studs (see
Figure C–1).
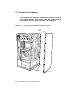
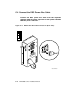
8. Using a nutdriver or ratchet set, remove the two 5/16 inch bolts (see
Figure C–2). Pull the top cover toward you and lift it off.
Figure C–2: Top Cover Removal (Rear View)
msb-0147-89
TOP COVER
SCREWS
Installing an Expander Cabinet C–3