
Installation guide
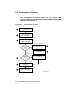
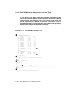
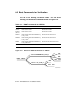

Power up the system and check self-test results. Section 7.2 discusses
details of self-test. Entering the INITIALIZE command at the console
prompt also generates self-test, as shown in Example 8–1.
Check the STF line to see that all XMI modules passed self-test. Check
the ETF line to see that all CPUs passed the extended test.
For Model 500 and 600 systems, the multiprocessor tests are run
every time self-test is generated. The multiprocessor tests are not run
for Models 300 and 400. So, for these systems, during installation
verification, you must run the multiprocessor tests separately.
Check the XBI line for self-test results for VAXBI modules, and note
the DWMBB/A module’s XMI node number. Example 8–1 shows the
DWMBB/A in node E—see and . You need this information for the
boot command.
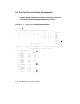
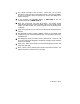
Enter SHOW CONFIGURATION at the console prompt. This generates
a more detailed listing of modules.
If you are booting using a CD server, find the DEMNA, DEBNI, or
DEMFA node number. Example 8–1 shows both a DEMNA and DEBNI,
for example only; this is an unlikely configuration. Here the DEMNA
is XMI node D ( ); the DEBNI is VAXBI node 6 ( ).
Shows the position of the DWMBB/A module (see above for details).
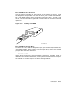
Shows the position of the TBK70 adapter for the in-cabinet TK tape
drive. In this example the TBK70 is VAXBI node 4.
For a TF tape, a KFMSA adapter on the XMI would support the in-
cabinet tape drive or a TF857 in the SF2xx cabinet. When there is
more than one KFMSA in a system, determine which KFMSA supports
the TF in one of two ways: check the cabling from the XMI backplane
to the TF drive, or run the level 3 diagnostic EVCXF and check the
printout (see Section 3.6.3).
Shows the position of the DEBNI (see above for details).
Verification 8–7