
Specifications


Your CoolTech
®
pump has been designed for dependable use and long life. If something
should go wrong, however, the following guide will help you get the pump back in service as
quickly as possible.
If disassembly of the pump is required, please check your warranty. The warranty may be
voided by misuse or customer tampering, which results in the pump being inoperable.
1.Be sure the oil is not a residual accumulation from spillage, etc.
2. If leakage exists, the module cover gasket or the shaft seal may need replacing. Follow
the instructions supplied with the Seal Replacement Kit, part number 15367. If leakage
exists in the area of the oil drain plug, you may need to reseal the plug using a commer-
cial pipe thread sealer.
1. Be sure the vacuum gauge and all connections are in good condition and leak-free.
You can confirm leakage by monitoring the vacuum with a thermistor gauge while applying
vacuum pump oil at connections or suspected leak points. The vacuum will improve briefly
while the oil is sealing the leak.
2. Be sure the pump oil is clean. A badly contaminated pump may require several oil flushes.
See OIL CHANGE PROCEDURE.
Note: Use only high vacuum pump oil such as Robinairs’ Premium High Vacuum Pump Oil.
Other oils will prevent pull-down to a deep vacuum.
3. Be sure the oil is at the proper level. For maximum pump operation, the oil must be even
with the OIL LEVEL line on the sight glass when the pump is running. See OIL CHANGE
PROCEDURE. Do not overfill —operating temperatures will cause the oil to expand so it
will appear at a higher level than when the pump is not running. To check the oil level,
start the pump with the inlet capped. Check the oil level in the sight glass. Add oil if neces-
sary.
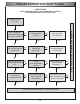
TROUBLESHOOTING GUIDE
21
Vacuum Pump
Oil
Leakage
Failure
To Pull
A Good
Vacuum