
Specifications


2-18 888-2857-001 5/9/13
WARNING: Disconnect primary power prior to servicing.
Section 2 Installation / Initial Turn-On
Platinum VAX-C Series
2.11 Transmitter Power Up
The VAX-C transmitter is now ready to produce RF power. The critical setup steps have
been performed. Some additional setup may be required to setup transport stream
handling, set RTAC states, system references, etc.
If valid transport streams are not present RF output may be inhibited for DVB-T
systems. In that case, the user must connect to the transmitter with a PC and web
browser in order to activate the PRBS test mode in the modulation setup pages.
Other modulation types do not require a valid TS to produce output as long as the
modulator settings are correct. This procedure does not attempt to describe modulator
settings (web browser Setup screens) that need to be set for the various modulation
types. For more detailed setup instructions refer to the transmitter technical manual
(section three).
The initial transmitter power up is as follows:
STEP 1 Refer to information provided above to confirm that grounding, AC
power, signal inputs, load or antenna hook-up and initial setup steps
have been performed.
!
CAUTION:
THE VAX-C TRANSMITTER MUST BE CONNECTED TO A KNOWN GOOD LOAD OR
ANTENNA BEFORE TURNING IT ON.
STEP 2
Disconnect the post-filter RF sample line at the VAX-C rear panel.
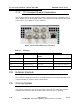
STEP 3 Press the Power menu button below the LCD screen to display the
forward and reflected power levels.
STEP 4 Press the ON button on the transmitter front panel to activate RF power.
STEP 5 Press the Raise button on the front panel to slowly increase the
transmitter power to full TPO while monitoring forward and reflected
levels on the LCD Power screen.
STEP 6 Check the RF power level at the post filter RF sample line where they
connect to the transmitter rear panel.
STEP 7 Use pads to set the level within the -20 to +5 dBm range (-5dbm optimal)
STEP 8 Connect the post filter RF sample line at the rear panel of the VAX-C
transmitter.