
Specifications


5/9/13 888-2857-001 5-39
WARNING: Disconnect primary power prior to servicing.
Section 5 Maintenance and Alignments
Platinum VAX-C Series
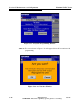
STEP 5 In the local area connection properties window, scroll down in the sub
window until the Internet Protocol (TCP/IP) selection appears.
STEP 6 Click on the Internet Protocol (TCP/IP) selection.
STEP 7 Click on the Properties soft key below and to the right of the sub
window.
STEP 8 The Internet Protocol (TCP/IP) Properties window will appear.
STEP 9 In this window, two choices appear, they are:
a. Obtain an IP address automatically. This choice sets the computer in
the DHCP client mode.
1.If this choice is selected, the ethernet network to which the com-
puter is connected will automatically give it an IP address for that
network, as long as that network has a DHCP server.
b. Use the following IP address. This choice sets the computer in the
Static address mode.
1.If this choice is selected, enter the desired IP address in the space
provided. The first three sections of the address must be the same
as the network or VAX-C to which the computer is connected
2.The last section of the address must be a number which is not
already in use by that network. It can range from 1 to 254.
3.The subnet mask address will automatically be entered when its
space is entered.
5.12.6.1 Verifying The Computer IP Address
When the previous procedure has been completed, the computer’s IP address can be
verified using the following procedure.
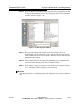
STEP 1 On the computer press Start > Run.
STEP 2 The Run window should open.
STEP 3 The run window open box should display cmd.
a. If cmd is not displayed, type ’cmd’.
b. Next press OK.
STEP 4 The cmd.exe window will open.
STEP 5 Type in ’ipconfig /all’, then hit enter.