
Specifications


5-38 888-2857-001 5/9/13
WARNING: Disconnect primary power prior to servicing.
Section 5 Maintenance and Alignments
Platinum VAX-C Series
5.12.5.2 Direct Connection, Computer To VAX-C Rear Ethernet
Connector
Direct connection to the VAX-C’s rear RJ45 connector is not recommended, but it
can be done. The front panel, with its DHCP server is recommended for direct
connection.
When directly connecting a computer to the VAX-C rear panel ethernet connector, the
connecting computer must be setup on Static IP mode with the first three segments of
its address set the same as the first three segments of the address of the rear connector of
the VAX-C. For example, assume the VAX-C rear panel address is 137.237.242.138.
The computer address must be set to 137.237.242.yyy, where yyy is any number below
255, excluding 138 and 0. In other words, the Static IP address must be within the
DHCP range and must be an otherwise unassigned IP address.
Direct connection to the rear panel by a computer set to the DHCP client mode may
work if both had been connected to the same network. This assumes the DHCP assigned
IP address has not changed.
STEP 1 Connect an ethernet cable between the computer and the VAX-C rear
panel RJ45 connector.
STEP 2 Go to Internet Explorer and type the rear RJ45 connector address. Using
the example given above, the rear connector address will be
137.237.242.138
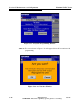
STEP 3 Log In Screen should appear.
STEP 4 Log in using user name and password.
STEP 5 The VAX-C web GUI is now displayed and can be navigated as needed.
5.12.6 Changing PC Operating Mode Static/DHCP
STEP 1 Connect an ethernet cable between the computer and the VAX-C rear
panel RJ45 connector.
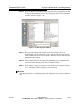
STEP 2 On the computer, click Start > Settings > Network Connections. The
network connections window will appear.
STEP 3 In the network connections, right click on the network connections soft
key, a drop down list will appear.
STEP 4 From the drop down list, select properties. The Local Area Connection
Properties window will appear.