
Specifications


5/9/13 888-2857-001 5-37
WARNING: Disconnect primary power prior to servicing.
Section 5 Maintenance and Alignments
Platinum VAX-C Series
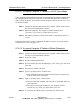
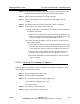
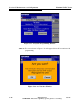
STEP 3 The Ethernet #1 window gives the front Ethernet parameters.
5.12.5 Connecting Via VAX-C Rear Panel Ethernet
Connector
Two methods are used to connect to the rear panel RJ45 connector, they are as follows:
• Connecting through an existing ethernet network.
• Direct connection, computer to VAX-C rear RJ45 connector.
Both of these connection methods are described below.
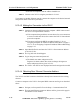
5.12.5.1 Connecting To VAX-C Via Existing Ethernet Network
When connecting to an VAX-C through an existing ethernet network, the connecting
computer can be setup on static IP if it has already been assigned an address on the
network in question. If it has not already been assigned an address on that network, it
must be setup as a DHCP client so the network can assign it an address.
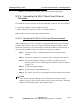
STEP 1 Connect the VAX-C rear RJ45 connector to the existing ethernet
network.
STEP 2 Connect the computer to a connector on the existing ethernet network.
STEP 3 Go to Internet Explorer and type the VAX-C rear RJ45 connector
address found in "5.12.4.4 Obtaining Rear Ethernet Connector Address"
on page 5-36.
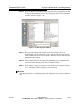
STEP 4 Log In Screen should appear.
STEP 5 Log in using user name and password.
STEP 6 The VAX-C web GUI is now displayed and can be navigated as needed.
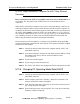
NOTE:
Some network switches utilizing secure connections will require the MAC
address to be given to the switch to allow traffic to pass to and from it. The MAC
address can be found just above the IP address Field.