
Specifications


5-36 888-2857-001 5/9/13
WARNING: Disconnect primary power prior to servicing.
Section 5 Maintenance and Alignments
Platinum VAX-C Series
a. The new IP computer ethernet address should be set.
STEP 9 Connect to the VAX-C using the procedure in 5.12.4.3 .
To reconnect to another Ethernet network, connect the computer to the desired network
and perform either of the above procedures.
5.12.4.3 Making the Connection to the VAX-C
STEP 1 Connect an ethernet cable between the computer’s RJ45 connector and
the VAX-C front panel RJ45 connector.
a. If the computer being used does not auto-detect for cross connection,
a crossover cable must be used to connect the VAX-C front ethernet
port to the computer.
b. If necessary perform the DHCP procedure found in "5.12.4.1
Assigning Computer IP Address in DHCP Client Mode" on page 5-
35 or "5.12.4.2 Assigning Computer IP Address Without Rebooting"
on page 5-35.
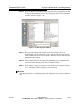
STEP 2 Open Mozilla Firefox and enter the VAX-C’s front connector address:
(192.168.117.88).
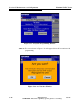
STEP 3 The Log In Screen should appear.
STEP 4 Log in using user name and password.
a. The default user name and password for
Engineer1 is admin, admin. Provisions to change the login user
names and passwords are given in 5.12.2 .
STEP 5 The VAX-C web GUI is now displayed and can be navigated as needed.
5.12.4.4 Obtaining Rear Ethernet Connector Address
The VAX-C rear RJ45 connector should have already been connected to the existing
ethernet.
Connect a computer to the VAX-C front panel RJ45 connector and log in as described
above.
STEP 1 Navigate, on front panel LCD to the Setup > Communications Tab.
STEP 2 The rear panel Ethernet connector address will be given on this page in
the Ethernet #2 sub window.