
Specifications


5/9/13 888-2857-001 5-35
WARNING: Disconnect primary power prior to servicing.
Section 5 Maintenance and Alignments
Platinum VAX-C Series
5.12.4.1 Assigning Computer IP Address in DHCP Client Mode
If the computer is in the DHCP client mode, it will automatically obtain an address from
the front panel RJ45 (Ethernet) connector. Use the following procedure to obtain an
address for the computer. To avoid reboot of the computer refer to Section 5.12.4.2 for
an alternate method.
STEP 1 Connect an ethernet cable between the computer’s RJ45 connector and
the VAX-C front panel RJ45 connector.
STEP 2 Reboot the computer. The computer’s address should now be
192.168.117.yyy, where yyy ranges from 129 to 135.
STEP 3 It should be possible to connect to the VAX-C using the procedure in
5.12.4.3 .
If this procedure fails to assign a compatible IP address to the PC, use the procedure
listed below at 5.12.4.2 on page 5-35.
5.12.4.2 Assigning Computer IP Address Without Rebooting
STEP 1 Connect an ethernet cable between the computer’s RJ45 connector and
the VAX-C front panel RJ45 connector.
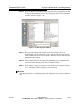
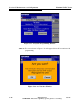
STEP 2 Press Start > Run.
STEP 3 The Run window should open.
STEP 4 The run window open box should display ’cmd’. If not, type ’cmd’, then
press OK.
STEP 5 The cmd.exe window will open.
STEP 6 Type in ’ipconfig /release’, then hit enter.
a. This will disassociate the computer from the previous ethernet net-
work to which it was connected.
STEP 7 Type in ’ipconfig /renew’, then hit enter.
a. This associates the computer with the VAX-C front panel RJ45 eth-
ernet connector.
b. The VAX-C will assign an address to the computer, which is
192.168.117.yyy, where yyy ranges from 129 to 135.
STEP 8 To verify the new address type in ’ipconfig /all’, then hit enter.