
Specifications


5/9/13 888-2857-001 5-13
WARNING: Disconnect primary power prior to servicing.
Section 5 Maintenance and Alignments
Platinum VAX-C Series
!
CAUTION:
DO NOT APPLY EXCESSIVE DOWNWARD PRESSURE (WEIGHT) ON THE TYPE N
OUTPUT CONNECTOR. IF A DIRECTIONAL COUPLER IS ATTACHED DIRECTLY TO
THE OUTPUT CONNECTOR IT SHOULD BE ADEQUATELY SUPPORTED.
EXCESSIVE STRESS ON THE CONNECTOR MAY CAUSE INTERNAL DAMAGE AND
RESULT IN HIGH VSWR CONDITIONS THAT COULD CAUSE ARCING OR HEATING.
STEP 3
Once the coupler coupling value is determined, enter this value as a
power meter off, set the meter’s display to read in dBm or Watts and
connect the power meter sensor to the forward coupler port.
NOTE:
The sample level present at this coupler port (TPO - coupling value) must not
exceed the maximum input range of the power sensor in use.
NOTE:
Calibration must be performed with the transmitter operating into a known good
load or antenna system. If reflected power rises to a level that exceeds 10% of
forward power stop raising power. Turn off the transmitter and begin checking
the output components (transmission line, load, antenna) for faulty components
that produce high VSWR (voltage standing wave ratio) levels.
STEP 4 Connect the transmitter output to a known good load. If required, use a
short, high quality, low VSWR, 50 ohm cable preferably RG-213 or
better.
STEP 5 Apply AC power to the transmitter chassis.
STEP 6 Press Remote Disable on the front of the transmitter.
STEP 7 Press and hold the Power Lower button for 20 seconds to lower
transmitter output power at turn on.
STEP 8 Press the transmitter ON button while monitoring transmitter forward
power on the external power meter. Monitor reflected power on the LCD
screen. Slowly raise the power to the desired operational power level
and allow the transmitter to run for several minutes until output power is
stable.
STEP 9 Compare the external power meter value with the forward power
displayed on the LCD screen. If the values do not agree proceed with
calibration.
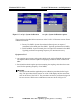
STEP 10 Use the LCD screen and control buttons to navigate to the calibration
menu SETUP> XMTR POWER SETTINGS> POWER CAL>