
Specifications


5-6 888-2857-001 5/9/13
WARNING: Disconnect primary power prior to servicing.
Section 5 Maintenance and Alignments
Platinum VAX-C Series
5.2.2 PA Module Installation
Required Tools:
WAGO extractor tool
#1 Phillips screw driver
M7 (9/32") nut driver
NOTE:
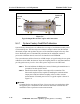
Refer to Figure 5-3 on page 5-4 for location of components and connectors noted
in the procedure below.
The type of PA module may vary depending on transmitter model. PA and PS modules
must be removed (or installed) with the transmitter turned off and unplugged.
STEP 1 Turn off the transmitter and disconnect AC power.
!
WARNING:
REMOVE AC POWER FROM THE VAX-C TRANSMITTER BEFORE ATTEMPTING PA
MODULE REMOVAL. THERE ARE EXPOSED VOLTAGES IN THE PA SECTION THAT
MAY CAUSE INJURY OR DAMAGE TO COMPONENTS IF CONTACTED.
STEP 2
Remove the four screws from the top cover on the VAX-C and slide the
cover toward the rear of the unit to remove it.
STEP 3 Place PA module partially into chassis with PA interface board tilted
upward.
!
CAUTION:
DO NOT DAMAGE COMPONENTS ON PA INTERFACE BOARD WHEN INSTALLING
THE PA MODULE INTO THE CHASSIS
STEP 4
Connect ribbon cable W5 to J5 on the underside of the PA interface
board.
STEP 5 Position the PA module flange mounting bracket hole over the stud in the
bottom of the chassis. Lower the PA module onto the transmitter chassis
backplane.