20-INCH TFT-LCD MONITOR 20RTC INSTRUCTION MANUAL Please read this manual thoroughly before use, and keep it handy for future reference.
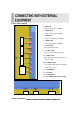
SAFETY INSTRUCTION…………………………………………………………………….2 - 3 CAUTIONS ………………………………………..……………………………………………..4 FCC RF INTERFERENCE STATEMENT …………………………………………………….5 CONNECTING WITH EXTERNAL EQUIPMENT…………………………………………… 6 REMOTE FUNCTIONS ……………………………………………………………………….. 7 CONTROLS AND FUNCTIONS…………………………………………………………..8 - 14 D-SUB CONNECTOR PIN ASSIGNMENTS ……………………………………………….15 POWER MANAGEMENT……………………………………………………………………..16 SPECIFICATIONS………………………………………………………………………. ……17 TROUBLESHOOTING GUIDE. ……………………………………………………………..18 .
1. Read all of these instructions. 2. Save these instructions for later use. 3. Follow all warnings and instructions marked on the product. 4. Unplug this product from the wall outlet before cleaning. Do not use liquid cleaners or aerosol cleaners. Use a damp cloth for cleaning. 5. Do not use this product near water. 6. Do not place this product on an unstable cart, stand or table. The product may fall, causing serious damage to the product. 7. Please keep the below conditions. A.
13. Do not attempt to service this product yourself, as opening or removing covers may expose you to dangerous voltage points or other risks. Refer all servicing to service personnel. 14. Unplug this product from the wall outlet and refer servicing to qualified service personnel under the following conditions. A. When the power cord or plug is damaged or frayed. B. If liquid has been spilled into the product. C. If the product has been exposed to rain or water. D.
▶ NEVER REMOVE THE BACK COVER Removal of the back cover should be carried out only by qualified personnel. ▶ DO NOT USE IN HOSTILE ENVIRONMENTS To prevent shock or fire hazard, do not expose the unit to rain or moisture. This unit is designed to be used in the office or home. Do not subject the unit to vibrations, dust of corrosive gases. ▶ KEEP IN A WELL VENTILATED PLACE Ventilation holes are provided on the cabinet to prevent the temperature from rising.
NOTE This equipment has been tested and found to comply with the limits for a Class B digital device, pursuant to Part 15 of the FCC Rules. These limits are designed to provide reasonable protection against harmful interference in a residential installation. This equipment generates, uses and can radiate radio frequency energy and, if not installed and used in accordance with the instructions, may cause harmful interference to radio communications.
A.
F. REMOTE CONTROLLER 1. POWER( ) Turns the power ON or OFF. There will be a few seconds delay before the display appears. 2. SOURCE Select pc or video( PC / AV1 / AV2 / S-Video ) sources. 3. MUTE Mute the sound. 4. MENU Activates and exits the On Screen Display. 5. VOL( ) Increases or decreases the level of audio volume. 6. UP/DOWN( ) Move to OSD menu. 7. AUTO Auto geometry adjustment in PC Source. 8. EXIT Exit the On Screen Display.
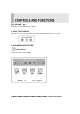
SOURCE MENU D DOWN E UP VOL VOL F G A. POWER ON/OFF( C B A ) Turns the power ON or OFF. There will be a few seconds delay before the display appears. The power LED(next to the power switch) lights with green when the power is turned ON. The power is turned off by pressing the power switch again and the power LED goes Red. B. POWER LED Power ON : GREEN Stand-by : AMBER Power OFF : RED C. IR Sensor Remote controller sensor. D.
GE. VOLUME ( ) Adjust the volume / Adjust menu settings. 1. SELF-TEST DISPLAY When there is no connection at PC, the On Screen Display will show for 3 seconds. 2. OSD MENU DESCRIPTION : Input Source Select PC or AV1, AV2, SVIDEO.
: Screen : Brightness Increase or decrease the intensity of the image. : Contrast Increase or decrease the intensity (lightness or dimness) of the image. : H. position (PC Mode Only) Move image horizontally on screen right or left. : V. position (PC Mode Only) Move image vertically on screen up or down. : Clock (PC Mode Only) Adjust the vertical noise of screen image. : Phase (PC Mode Only) Adjust the number of horizontal picture elements.
: Audio : Volume Adjust audio volume. : Equalizer (Loudspeaker Only) Boost / Cut specific frequency or compensate for frequency distortion of the sound. Select preferred Sound setting: flat, music, movie, speech and Adjust the level of the Sound frequency in user mode. : Balance (Loudspeaker Only) Adjust the balance of left and right speaker sound. : Loudness (Loudspeaker Only) Compensate the sound to consider the frequency sensitivity of human ear.
: OSD : H. Position Move the OSD position to right(▶) or left(◀). : V. Position Move the OSD position to up(▶) or down(◀). : Transparency Select the OSD background. : OSD Timer Select the OSD display timing. : Language Select a language among English, Français, Deutsch, Español, Danish, Italiano.
: Color (PC Mode) : Color Temp Adjust color temperature to 9300, 6500, user. (note : 9300 is factory default) : Red Adjust red color for user. : Green Adjust green color for user. : Blue Adjust blue color for user.
: Utility : Recall Select to reset all setting to the factory default values. : Lock Select ON or OFF (ON : Control key lock. OFF : Control key unlock) : Exit : Exit Turn off OSD Menu.
▶ PIN ASSIGNMENTS ▶ ACCESSORY 1. POWER CORD 2. USER’S MANUAL 3. PC cable 4. Remote Control 5. Batteries 6. Wall mount (Option) 7.
This monitor features a power management system to “power down” upon receipt of the VESA DPMS(The display power management signaling) from a VESA DPMS video card. The VESA DPMS-compliant video card performs this signaling system through not sending horizontal, vertical, or sync signal. This monitor enters an appropriate mode through identifying each of the three modes of the signaling system.
▶ LCD Type 20.1˝ Diagonal AM-TFT(Active-Matrix) Pixel pitch(mm) : 0.51(H) X 0.51(V) BRIGHTNESS: 450cd/㎡(Typical) CONTRAST RATIO: 500:1(Typical) RESPONSE TIME: Tr -5msec, Tf-11msec(Typical) ▶ RESOLUTION(H x V) 800X600 @75Hz ▶ FREQUENCY HORIZONTAL: 31-48KHz VERTICAL: 56-75Hz ▶ INPUT SIGNAL VIDEO(Analog 0.7Vp-p / 75Ω) SYNC(Separate TTL Level) S-VIDEO, AV(Composite, Sound L/R) PC Stereo Sound ▶ ACTIVE DISPLAY AREA (W x H) 408mm X 306mm ▶ PACKING DIMENSIONS (W x D x H) 535mm X 175mm X 480mm(21.07” X 6.89” X18.
WEEE Symbols Correct Disposal of This Product (Waste Electrical &Electronic Equipment) (Applicable in the European Union and other European countries with separate collection systems) This marking shown on the product or its literature,indicates that it should not be disposed with other household wastes at the end of its working life.