
Operation Manual

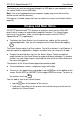


Table Of Contents
- INTRODUCTION
- GENERAL DESCRIPTION
- General View
- USB port and Headset Jack
- Installing microSD, SIM, and UIM Cards
- Setting up Wi-Fi
- Making Telephone Calls
- Keyboard
- Power Supply
- Turning the Device on/off
- Display and Main Menu
- On-screen Keyboard
- Application Menu
- Context Menu
- Basic Editing
- Notifications Panel
- Pronunciation of Words and Sentences
- Voice Input
- PC Communication
- TRANSLATION AID & LANGUAGE STUDIES
- Text Translation
- Voice Translation
- Photo Translation
- Audio Phrasebook™
- Usage of Audio PhraseBook for Foreign Language Studies
- Universal Translator
- Dictionary
- English Dictionary
- Picture Dictionary
- Language Teacher®
- U-Learn™
- Vocabulary Builder
- Linguistic Crossword
- SpeedReading Course
- Pockets
- Linguistic FlashCards
- Spell-It-Right
- Translation Test
- Learning Settings
- OTHER CAPABILITIES

ECTACO
®
SpeechGuard
®
TLX User Manual
11
Volume up/
Volume down
Adjust the volume.
Camera button
Activate camera. Take a picture.
Back
Close application and go to the Home Screen. Cancel.
Menu
Show or hide the application menu. When in the Home Screen,
press this key to activate the system menu.
Search
Search. In the search window, enter the desired word or title you
want to find.
Home
Switch to the Home Screen. Press and hold: show recently used
applications.
Power Supply
ECTACO
®
SpeechGuard
®
TLX is powered by a special Li-Polymer rechargeable
battery. When the battery becomes low, a warning message will be displayed. To
restore full functionality of the device, recharge the battery as soon as possible.
The battery compartment is located on the back of the device and is covered with
a plastic cover. To open the battery compartment, unscrew six screws, holding the
battery compartment cover.
How to Recharge the Battery
Only a special charger may be used with your ECTACO
®
SpeechGuard
®
TLX.
Use of an inappropriate external power supply may cause failure of the device and
will void the warranty.
Battery charging is performed via micro-USB port by using the AC/DC adapter or
by a computer with USB-cable. The micro-USB port is located on the lower edge
of the device and protected by a cover which can be removed by sliding the pair of
lock switches inward.
Note: Charge the battery for at least 5 hours prior to the first use of the device.
When the battery is fully discharged, the device might not turn on even if you
connect it to the AC/DC adapter. You may need to charge the battery for 2 hours
before turning on the device.
Turning the Device on/off
To turn the device on or off, press the On/Off button (see General View on page
7). When the device is in sleep mode, press the On/Off button briefly to turn the
device on. Otherwise, press and hold the On/Off button for 3–5 seconds. If the
screen remains blank, connect the AC/DC adapter to your device via the micro-
USB port. The LED signal shows that the battery is recharging.
To put the device in sleep mode, press the On/Off button briefly.
To shut down the device, press and hold the On/Off button for a few seconds.