v1.
Copyright © 2013 Vapify LLC. All rights reserved. Disclaimer Information in this manual is protected by copyright laws and is the property of Vapify.us™ and Vapify LLC. Changes to the specifications and features in this manual may be made by Vapify LLC without prior notice. No part of this manual may be reproduced, copied, translated, transmitted, or published in any form or by any means without Vapify.us™ or Vapify LLC’s prior written permission.
FOGBANK™ Vapor Tank Kit Box Contents Fogbank™ advanced battery Vapor Tank Head and Tip USB Charge Cable Support Collar Spare tip 3 replacement cartomizers 2 E-Liquid Polymer Carrying Case * The box contents above are for reference only and the actual items shall depend on the product package you obtain.
FOGBANK™ CE5 Kit Box Contents Fogbank™ advanced battery CE5 Head and Tip USB Charge Cable 3 replacement coils 2 E-Liquid Polymer Carrying Case * The box contents above are for reference only and the actual items shall depend on the product package you obtain.
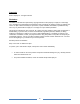
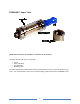
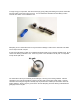
FOGBANK™ Advanced Battery The FOGBANK™ is constructed of a polished stainless steel body and features: 650 mAh protected battery soft activation button Information display window pass-through charging port (bottom) Battery safety circuits Orange, green and blue LEDs to indicate the current mode or function Charging When you first open your FOGBANK™, you should charge the battery. Unscrew the bezel from the bottom of the battery, then screw the battery into the included USB charger.
The FOGBANK™ is protected by a battery safety circuit. If the activate button is pushed for longer than 10 seconds while the battery is connected to the CE5 or Vapor Tank, or the battery detects a inconsistent resistance, it will shut down and the transparent ring will blink blue 8 times. This is often an indication of a failing cartomizer, coil, or that it is time for a cleaning. Occasionally a cartomizer or CE5 tank will leak liquid into the top of the battery contact.
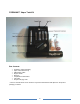
FOGBANK™ CE5 The CE5 reservoir is made up of 4 components: The tip The reservoir body The lower body And the coil assembly To begin using your CE5, simply unscrew the tip from the body, hold the unit at a 45 degree angle and fill with e-liquid to the fill-line (1.6ml), while being careful not to put liquid down the center air hole.
The coil assembly must be replaced after a period of extended use. A coil assembly typically lasts from about a week to a month, depending on the frequency of use and the type of e liquid used. The CE5 will need to be disassembled in order to replace the coil assembly. Before proceeding, remove the CE5 from the battery. All of the components are threaded together. Disassemble the unit by unscrewing the tip and clear tank from the knurled base. Rinse out the tank with tap water then pat dry.
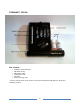
FOGBANK™ Vapor Tank [NOTE: Never activate a dry cartomizer. It will burn out in seconds.] The Vapor Tank is made up of 4 components: The tip Vapor Tank Body The cartomizer Stabilizing collar The vapor tank design provides maximum vapor and airflow and is the go-to choice for advanced e-cig users. For users that wish to use a more convenient design, please check out the FOGBANK™ CE5.
To begin using your vapor tank, first remove the tip by gently pulling and twisting, then pull the cartomizer from the bottom of the tank to fully remove it. You can thread the cartomizer into the battery to aid in removal. Use caution not to activate the unit. Attempting to use a cartomizer when it is dry will result in damage or failure of the cartomizer coil. Make sure to keep it wet with e-liquid! A vapor tank cartomizer is made up of a stainless steel barrel with a ring of wicking material inside.
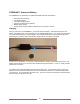
Do not drip the e-liquid straight down the cartomizer barrel. This will result in wasted liquid dripping out the bottom of the carto, and a mess. Next, wipe the outside of the cartomizer with a paper towel, and blow on the top of the cartomizer. This action will force the e-liquid down the wicking material into the cartomizer. Putting your finger over the bottom hole of the air-path, while making sure not to block the side vents of the cartomizer barrel, helps speed this process.
Repeat dripping 4 or so drops down the inside edge of the cartomizer. Then blow again from the top of the carto. Repeat these steps several times until liquid begins to come out the small holes on the side of the barrel. Once liquid begins to appear, wipe off the bottom of the cartomizer with a paper towel, and while holding the paper towel on the bottom of the carto, give one more gentle blow, this time from the threaded side to clear out any liquid in the air-path.
Gently insert the cartomizer into the vapor tank about ¾ of the way. Next, hold the cartomizer and tank at a 45 degree angle and pour e-liquid down the outer edge of the tank until it’s about ¾ full. Then slide the cartomizer the rest of the way into the vapor tank until the bottom flange slides home, and the carto is sticking out the top of the vapor tank. Insert the tip into the cartomizer and give it a dry-hit (while not pressing the activate button).
FOGBANK™ CE5 Troubleshooting Steps The device does not produce vapor, or produces little vapor. Verify that the device is turned on, filled at least half-way, and fully charged. If these conditions are met, take off the CE5 head and inspect the battery connector on the CE5 head and battery contacts. Wipe thoroughly clean the battery connector, and the bottom side of the CE5 with a twisted paper towel.
FOGBANK™ Vapor Tank Troubleshooting Steps I have installed a new cartomizer and followed the loading instructions, but the unit produces little or no vapor. Check that the cartomizer wicking holes are visible and clear for e-liquid flow into the tank. If the cartomizer is installed backwards, these holes may be blocked, which will prevent normal operation. The base of the cartomizer has a flange that mates up with a recessed edge in the bottom of the tank. Ensure the cartomizer is installed properly.