
Installation Manual
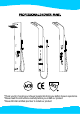


INSTALLATION INSTRUCTION OF YOUR SHOWER PANEL
MAKE SURE THAT YOUR HOT AND COLD WATER VALVES ARE IN CLOSED
POSITION BEFORE ANY WORK ON THE SYSTEM OF PLUMBING.
STEP 1: Preparation of your plumbing for new construction or existing.
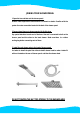
1.For new construction,the ends must be size 1/2'' and ? oriented 90 and face down
[ ].Otherwise,the joints of shower panel will have high chance to be folded and the water╗
needed for the proper function of your shower panel is overflowed.The risk of pipe broken is
greatly increased and also other damage caused.Please pay more attention to that.
2.In the case of an existing construction please follow the following steps.
A.You must remove all the elements of your old shower panel and hand shower spout.No pipe
inside the wall will be used for the operation of shower panel with expectation of pipe with hot
and cold water.Seal the holes left by your old shower to prevent any future infiltration in the
wall.You must now use fittings 1/2",90?oriented and down as follows [ ]for the connection╗
of your shower panel.
3.CLOSE THE VALVE FOR HOT AND COLD WATER BEFORE ANY WORK ON THE SYSTERM OF
PLUMBING.
Step2:Installation of your shower panel on the wall.
NOTE:
‐IT IS BETTER TO HAVE 2 PEOPLE TO TAKE THE MEASURE FOR THIS STAGE.
‐DO NOT CONNECT THE HOSE WITHOUT HAVING MADE THE INSTALLATION OF STEEL WALL
SUPPORT.
‐THE IDEAL DISTANCE BETWEEN YOU AND THE RAIN SHOWER HEAD IS 18''
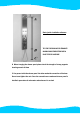
While one person is holding up the shower panel ready to deliver,the other shows with a
pencil on the wall where the shower panel begins.Please see letter B on the photo.
B.Measuring the distance between the bottom of shower panel and the horizontal.This
measure is BC(the distance between the ground and the bottom of shower panel)
C.Now drill your wall for the installation with steel wall support.Use a level to be sure that the
mark on medium steel wall is horizontal.Avoid over tighten the screw.