
Specifications

3-Way Switch Application
The RadioLink Satellite ScenePoint Dimmer station and Satellite
keypad (part numbers: RDSS1-(X) & SK-1) are available from
Vantage for 3-way applications. Also, a standard RadioLink
ScenePoint Dimmer Station may be used in any 3-way
application. Installing a standard RadioLink ScenePoint Dimmer
station - as a 3-way switch - is done the same way as a standard
installation with the exception that the Red (Load Out) wire is not
connected and is properly capped-off.
Station Set Up in Software
InFusion: First select the room, then click on Vantage Objects in
the Object Explorer and expand Stations, RadioLink. From the
list of stations double click on the ScenePoint Dimmer Station to
place it in the room. In the Object Editor, name the station and
make sure it is on the correct RadioLink bus port.
QLink: First make sure that the Main Controller is RadioLink
enabled in the QLink Project. Select the Controller in Hardware
View and look at its properties. It should have RadioLink on one
of its RS-232 Ports. To add a ScenePoint RadioLink Dimmer in
QLink, right click on the room and from the pop-up menu, select
Add RadioLink Station | ScenePoint Dimmer station. This will
reveal the RF ScenePoint Station Definition Box. Select the
number of buttons and loads according to the configuration of
the dimmer station and click OK.
Configuration
RadioLink stations need to be configured to associate which
physical station goes with the station in software.
When the station is initially powered-up, the Status LED will blink
three times followed by a pause - this means the station is
powered correctly but not yet on the network. Before uploading
the file to the Vantage system, do the following: From Design
Center, click in the Serial Number section in the Object Editor
and type in the serial number. From the menu bar in QLink,
select System/Configure Stations. A list of all stations will be
displayed on the screen. Manually enter the serial number for
each RadioLink station to match it with the corresponding
programming in QLink.
The serial number of each station is located on a permanent
sticker and a removable sticker on the front of the station.
Remove the sticker with the number only and place on the
Station Design Report for easy reference when programming.
The Main Controller will add to its network and configure all the
RadioLink stations that it has serial numbers for. This may take
several minutes depending on the number of RadioLink stations
on the network. The Status LED will blink steadily when a station
has been added to the network and configured.
Default Mode
The ScenePoint with RadioLink has a default mode that operates
without programming or being connected to the Vantage System.
If a ScenePoint has been programmed but communication with
the controller is lost, the ScenePoint will revert to default
operation. Multiple gang Dimmer loads are numbered from left to
right.
When default is the desired operation for a button, it may be left
unprogrammed and will continue to operate in default mode even
if other buttons on the dimmer are programmed.
Default Operation
Station Type Button to Load Mapping
1-gang Dimmer All buttons control the load.
All buttons in first (left)
gang.
One column of buttons
The top button controls the first load.
Second button controls second load etc.
All buttons in first
gang.
Two columns of
Top left button controls first load.
Top right button controls second load.
Second row left button controls third load.
Station Type Button to Load Mapping
buttons Second row right button controls fourth load.
One or two buttons
per gang.
Each button(s) controls the load in its gang.
When power is restored from a power outage the Dimmer will
return the loads to the last load level. This will occur whether or
not the Dimmer is connected to a system.
Button
Action
Load Operation
Single
Press
The load toggles between off and the learned level. The turn
on ramp time is 1.5 seconds and the turn off fade time is 5
seconds.
Double
Press
The load ramps to 100% in 1.5 seconds. The second press
must be within 1 second of the first press.
Press
and
Hold
After a one second delay the load will ramp in the opposite
direction from the last press and hold. If the load reaches 0 or
100% it will reverse direction. When the button is released the
current load level will be saved as the new learned level for
that button. The cycle time is 5 seconds from 0-100%.
When multiple buttons control the same load, each button will
have its own learn level.
Default IR Mode
If the ScenePoint has the optional IR receiver, it will have a
default IR mode that is active when it is not communicating with
a system or when none of the Scene Codes in its IR Zone have
been programmed.
The Scene Codes 230-239 are transmitted by the Scene buttons
1-10 on the Vantage IR Remote Control.
The Scene buttons 1-4, codes 230-233, controls loads 1-4
operating the same as the default operation for a button. Scene
9, code 238, will turn all station dimmer loads on. Scene 10,
code 239, will turn all station dimmer loads off.
Unlike the buttons, if any IR Scene button is programmed all of
the IR Scene buttons stop executing default operation.
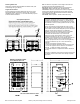
Service Switch for Lamp Replacement
An OFF switch is provided to disconnect power between the
Station and the fixture for lamp replacement. Service other than
lamp replacement requires the breaker to be switched off.
Reset
The ScenePoint stores the configuration data locally so that it will
continue to operate correctly if communication with the system is
lost. This information includes: LED properties, sounder
properties, load profile, last load level, and default learn levels.
To reset this information to the factory default, press and hold
switches 1-3 when power is applied to the station. The board will
respond by sounding three slow beeps to indicate that the reset
took place. Since buttons do not need to be installed in switches
1-3, the faceplate may need to be removed so that the switch
matrix can be pressed directly.
After a reset the load profile will be Default, the learn levels will
be 50%, the loads will all be off, and other settings will be at
factory default.
Note: If the Station Load was changed to RELAY this Process
will change it back to DIM. Make sure it is back on line with the
Main Controller before testing button or load operation.