OPERATING INSTRUCTIONS VALUELAM 4500
READ BEFORE OPERATING CAUTION... TO AVOID ANY DAMAGE, PLEASE DO NOT USE RAZORS OR SHARP OBJECTS NEAR THE ROLLERS.
Table of Contents I. For Your Safety...................................... 4 II. Electrical Safeguards ............................. 4-5 III. Specifications......................................... 5 IV. Set-up .................................................... 5-8 Inspection............................................... 5 Appropriate Location.............................. 5 Loading Film onto Mandrels................... 6 Film Tension ..........................................
OPERATING INSTRUCTIONS VALUELAM 4500 I. For your safety... Do not connect the laminator to electrical power or attempt to operate it until you have read these instructions completely. Keep these instructions in a convenient location for future reference. Read all safety messages located in this instruction manual and on the laminator very carefully. Always lower the safety shield before operating your laminator. Removing feed table exposes hot and moving parts.
Do not leave the laminator power on for extended periods while not in use. Unplug the machine at the end of the day as a precaution against a possible fire hazard. Do not operate the laminator with a damaged power supply cord or plug. Replace fuses only with same type rated 20, 250V and 1A, 250V fuses. Contact your dealer for replacement fuses. There are two (2) EMERGENCY STOP buttons on the laminator, one on each side. Depressing one of these buttons will stop the rollers. III. Specifications...
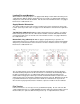
Loading Film onto Mandrels: When the film is loaded properly the core gripper blade will prevent the film from turning on the supply mandrel. With the gripper spring away from you, pull the core gripper blade toward you and place the roll of film onto the mandrel. Turn the roll on the mandrel to lock the core gripper blade into the cardboard film core. Supply Mandrel Orientation: The supply mandrels must be placed on the machine in the proper orientation to achieve film tension.
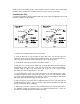
thumb screws in the mandrel holders. Turn clockwise to increase tension. This action clamps the brake on the mandrel axle creating tension necessary to achieve good results. Threading the Film: Your ValueLam 4500 was delivered with sample rolls of film. When changing film rolls, thread the film according to the instructions. 1. Remove the feed table and raise the safety shield. 2.
. Turn the SPEED CONTROL knob far enough to allow the rollers to sufficiently pull the poster board or cardboard into the laminator. Keep in mind that varying media and temperatures will require different speeds. 9. Feed the poster board or cardboard between the rollers. 10. If you are loading cold, allow the poster board or cardboard to continue through completely with the ends of both films. You may now raise the rollers to the open position to facilitate aligning the film and remove any wrinkles. 11.
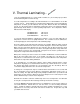
V. Thermal Laminating... 1. Be sure all laminator parts (i.e. safety shield, feed table, etc.) are in their proper positions and the laminating film is loaded correctly. 2. Set the temperatures according to the film manufacturer’s recommendations for the film you have chosen. A low-melt film is recommended for inkjet prints. Keep in mind that the temperature at which you will laminate will vary with different medias and laminating speeds. See the chart below for approximate temperature ranges.
6. Allow the ValueLam 4500 to run a small amount of film before feeding the print into the laminator to avoid a dwell line across your print. Feed the print slowly and evenly, smoothing it as the rollers pull it through. 7. You may laminate subsequent prints now, leaving ample space between each print for trimming. 8. Once your last print has completely exited the laminator, turn the MOTOR switch OFF. 9.
5. Turn the MOTOR switch ON and perform a test mount to ensure proper settings for successful mounting. If any adjustments are necessary make them now and run another test. Repeat this step until you obtain desired results. 6. Position the print to be mounted on a section of mount board up to ¼” thick behind a leader board. The leader board will prevent compression of the leading edge of your mount board. 7.
Cleaning Rubber Rollers: Excessive build-up of adhesive on the rollers may cause poor lamination quality and erratic film movement. Use the following procedure to remove any adhesive from the laminating rollers. 1. Turn the HEATED ROLLERS off and allow the laminator to cool. 2. Cut the film where it comes off the top and bottom supply rolls. Pull any film out of the laminator and away from the rollers. 3. Carefully remove the feed table to access the rollers. The feed table exposes hot and moving parts. 4.
IX. Trouble-shooting... Symptom Action Possible Cause Corrective LCD does not show display when heat switches are on. No power to laminator Close panel breaker Blown fuse Disconnect power and replace fuse Laminator not set to optimal laminating temperature Adjust temperature upward. Ink on print is wet Allow ink to dry thoroughly Paper is too slick Use a more matte Laminated item curls side bottom) film is curling toward. Top or bottom film tension is too high.
X. Do’s and Don’ts... • Read the instruction manual before operating your laminator. • Always run test samples before laminating valuable items. • • Feed the print through slowly and evenly, smoothing it as it is pulled into the laminator. • Operate the laminator with two rolls of the same width laminating film to avoid excessive adhesive transfer to the rollers. • If laminator is not in current use, lower the heat setting or turn unit off.
XII.
51 52 53 54 55 6546 10085 11045 10398 2325 Switch, Emergency Stop Motor, EZII, 80mm Variable Speed Control Chain, #35 Bulk Chain, Link, #35 Master 2 1 1 2 1 56 57 58 59 60 61 62 63 64 65 66 67 68 69 70 71 72 73 74 1172 11480 645040 645039 645041 11559 11560 11561 11571 645046 2777 645042 645043 11579 SR43-5 2664 2665 11586 7310 Fuse Holder, HTB-34I On/Off Switch 25A DP 43 Pin, Roller Adjustment Spring, Roller Pressure Lift Bar 45110 3/16-24 X 1” Lg Eyebolt Thumb Screw, 10-24 X Shim, Roller, 1 ¼ ID X P