
Instruction manual


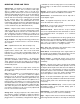

❍ 10. Connect the aileron extension, servo leads, battery
and switch wires to the receiver as directed by your radio
system manual. Wrap both the battery pack and receiver in
the supplied protective foam rubber to protect them from
vibration. Secure both the battery pack and receiver in the
model by placing the supplied hook and loop material
through the slots in the battery/receiver mounting plate and
then around the battery and receiver.
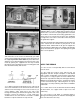
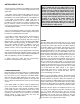
❍ 11. Make an antenna strain relief from one of the cut-off
servo arms and install it on the antenna. Route the receiver
antenna out of the fuselage as close to the receiver as you
can by drilling a 5/64” (2mm) hole in the side of the
fuselage and running the antenna through the side of the
fuselage. Connect the antenna to a hook made from
another leftover servo arm that was connected to a rubber
band and a T-pin inserted into the top of the fin.
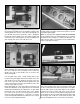
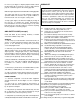
❍ 12. Make a pushrod guide tube support by using the
supplied 10mm x 13mm x 80mm balsa material. Place it
into the fuse as shown in the photograph above and mark
the locations of the throttle and steering guide tubes. Cut,
sand, or file a V or notch at these locations. Use sandpaper
to roughen the outer surface of the tubes where they meet
the guide tube support.
Reposition the guide tube support making sure the tubes rest
in the notches and do not bind or put pressure on the
pushrods. When satisfied with the fit, glue the support into
place and glue the guide tubes to the support using 6-minute
epoxy. Be careful not to get glue in the opening of the guide
tube or on the pushrod.
APPLY THE DECALS
❍ 1. Use scissors or a sharp hobby knife to cut the decals
from the sheet.
❍ 2. Be certain the model is clean and free from oily
fingerprints and dust. Prepare a dishpan or small bucket
with a mixture of liquid dish soap and warm water-about
one teaspoon of soap per gallon of water. Submerse the
decal in the soap and water and peel off the paper backing.
Note: Even though the decals have a "sticky-back" and are
not the water transfer type, submersing them in soap &
water allows accurate positioning and reduces air bubbles
underneath.
❍ 3. Position decal on the model where desired. Holding
the decal down, use a paper towel to wipe most of the
water away.
❍ 4. Use a piece of soft balsa or something similar to
squeegee remaining water from under the decal. Apply the
rest of the decals the same way.
23