
Instruction manual

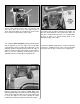

❍ 9. Remove the stab from the fuselage. Use a sharp #11
hobby knife, or refer to the Expert Tip on page 10, to cut
the covering from the stab 1/16” [1.6mm] inside the lines
you marked on the top and bottom of the stab. Do not
remove the covering from the trailing edge of the stab. Use
care to cut only into the covering and not into the wood.
Cutting into the balsa will weaken the structure.
❍ 10. Note: If you like you may remove the rudder and
elevator from the fin and stab for these steps. We will glue
them into place later.
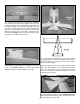
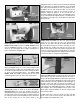
Fit the fin into the fuselage and mark the location of the
fuselage onto the fin with a felt tip pin. Also mark the
location of the fin on top of the fuselage. Using the same
method as with the stab, cut the covering material from the
marks on the bottom of the fin and the top of the fuselage.
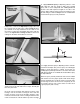
11. Apply 30-minute epoxy to all joining surfaces of the
stab. Slide the stab into position. Wipe away residual
epoxy with a tissue dampened with rubbing/denatured
alcohol. If the stab required a weight on one side or the
other to align it with the wing, position the weight. Use the
pin and string to confirm stab alignment. Do not disturb the
model until the epoxy has fully hardened.
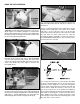
❍ 12. Apply 30-minute epoxy to all joining surfaces of the fin.
Insert the fin and wipe away excess epoxy. Use a 90-degree
triangle to check that the fin is vertical. If necessary, use
masking tape to pull the tip of the fin to one side or other of the
stab until it is vertical. Do not disturb the model until the epoxy
has fully hardened.
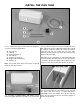
When the epoxy has fully hardened, make sure the rudder
and elevator are in the proper position with all the hinges
properly installed. Place six drops of thin CA on both sides
of each hinge location. Let the CA cure completely. Do not
use activator. Pull on each control surface to make sure it
is glued properly and securely.
12