
Instruction manual
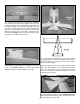

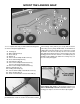

❍ 5. Support the model with a small stand or cardboard
box. Place the wing into the wing saddle on the top of the
fuselage. Stand five to ten feet behind the model and view
the stab and wing. If the stab and wing align with each
other, proceed to the next step. If the stab and wing do not
align, place a small weight on the “high” side of the stab to
bring it into alignment. If much weight is required, remove
the stab and carefully sand the slot in the fuselage where
the stab fits until it aligns with the wing.
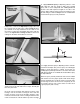
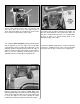
❍ 6. Stick a T-pin into the top of the fuselage centered in the
middle stringer over the firewall. Tie a small loop in one end of
a piece of non-elastic string (K & S #801 Kevlar thread;
K&SR4575). Slip the loop in the string over the T-pin.
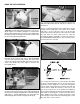
❍ 7. Fold a piece of masking tape over the other end of
the string and draw an arrow on it. Slide the tape along the
string and align the arrow with one end of the stab as
shown in the photograph.
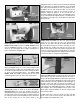
Swing the string over to the same position on the other end
of the stab. If the distance is not equal move the stab ½
way to the arrow then move the string back to the other
side to check alignment. Adjust the stab in this manner
until both sides are equal.
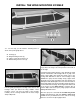
❍ 8. When you are satisfied with the alignment of the stab
use a fine-point felt-tip pen such as a Top Flite Panel Line
Pen (TOPQ2510) to mark the outline of the fuselage onto
the top and bottom of the stab.
11