
User Manual

Page 7 of 12
Veriteq, a Vaisala company Tel 604 273 6850
13775 Commerce Parkway 1 800 683 8374 (North America)
Richmond, BC, Canada, V6V 2V4 Fax 604 273 2874
www.veriteq.com | www.vaisala.com customersupport@veriteq.com
Installing a Digi Connect Wi-SP
1. Remove the antenna and disconnect the power supply from the Digi device.
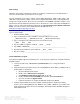
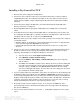
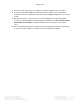
2. Change the MEI switch settings to enable command line configuration mode on the serial port.
These tiny switches are on the bottom of the device, near the serial port connector. Use a
toothpick or small screwdriver to set all four switches to the on/up position (away from the serial
port connector), as shown in the diagram.
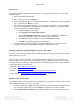
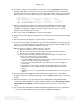
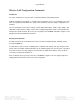
3. Plug the Veriteq-provided DB-9 crossover adapter (null modem, see picture below) into the
device’s serial port, then use a customer-supplied serial cable or USB-serial cable to connect the
device to the PC you will be using to run the installation software.
4. If your keyboard’s Scroll Lock LED is on, turn it off by pressing the Scroll Lock key. Start the
terminal emulation program, such as HyperTerminal. If using HyperTerminal, you may be asked
to supply a connection name.
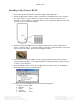
5. Select the COM port that is connected to the Digi device. You may need to use the Windows
Device Manager to determine which port this is.
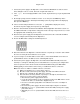
6. Configure the selected COM port in the terminal emulation program:
a. Bits per second: 9600
b. Data bits: 8
c. Parity: None
d. Stop bits: 1
e. Flow control: None