
Installation Manual

37Instructions for installation and servicing ecoTEC plus 0020020828_07
• Clean the burner with a soft brush taking great care
not to damage the front insulation. DO NOT use wire
or sharp instruments to clean the holes of the burner.
• Inspect the burner for any signs of damage.
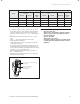
• Remove and discard the burner door seal and replace
with new, see fig 8.7.
Removal of the burner is not necessary during a normal
service.
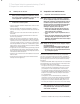
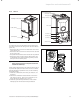
burner
door
seal
burner
g
as valve
compact
thermal
module
insulation
fan
section through
burner door showing
position of seal
Fig. 8.7 Compact thermal module
h
Note!
If the burner has to be removed it will require
a new gasket and nuts when refitted (Article
No. 0020038670)
.
h
Note!
When replacing ensure that the sealing grom-
met, situated below the gas valve is correctly
re-seated.
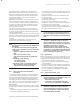
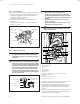
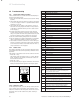
8.1.7 Combustion chamber and heat exchanger
insulation
heat exchanger
Fig. 8.8 Insulation
Remove loose debris from combustion chamber using a
soft brush and vacuum cleaner. Carefully flush any re-
maining debris through the condensate trap (ensure the
water is kept away from electrical components).
8.1.8 Condensate drain
The condense drain does not normally need removing
during servicing. To flush the condense drain carefully
pour water into the heat exchanger and check that water
flows freely to drain. If the condense drain is blocked,
refer to parts replacement section 11 for removal.
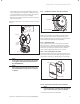
8.1.9 Inner casing panel seal check
Check the condition of the seal, replace as required. To re-
place remove the old seal, thoroughly clean the casing sur-
faces. Fit the new seal, it is supplied to the correct length.
inner casing
seal
front casing
Fig. 8.9 Panels
8.1.10 Checking the expansion vessel (If fitted).
h
Note!
It is not necessary to perform this check every
year a check every three years is sufficient.
• Release the pressure from the boiler.
Inspection and maintenance 8