DYNAMIC POWER CONTROL
ES - Querido Cliente, Dear Customer, Está viendo el manual de instalación y configuración del This is the installation and configuration manual of Dynamic Power Control. control dinámico de potencia. Si desea comentarnos algún tipo de sugerencia para nuestra mejora, puede hacerlo a través del correo info@v2charge.com. If you have any suggestion for our improvement, please send us a mail: info@v2charge.com. Esperamos que le sirva de ayuda. Gracias, el Equipo de V2C.
Verify the e-Charger is switched off (without voltage) before installation. ES - Comprueba que el e-Charger está apagado (sin tensión) antes de realizar la instalación. PT - Verifique que o e-Charger está apagado (sem tensão) antes de realizar a instalação. 2. LEGAL NOTICE ES - 2. AVISO LEGAL PT - 2. AVISO LEGAL This manual is subject to change without notice. The images contained in this manual are representative and may differ slightly from the actual products.
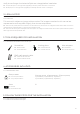
1. Connect the slave to the master board of the e-Charger via a category 6 RJ45 Ethernet cable. ES - Conecta el esclavo a la placa master del e-Charger a través de un cable RJ45 Ethernet de categoría 6. PT - Conecte o elemento escravo na placa master do e-Charger através de um cabo RJ45 Ethernet de categoria 6. 1 2 3 4 5 6 2. Locate the phase supplying the whole installation and connect the clamp meter. Release the sensor and fit around the power cable. Close the clip to hold it firmly in place.
Important. Red LED flashes in case of any communication error. The cause is related to the network cable (the problem may be caused by the cable head). Please, re-crimp, connect and check the cable. Even if the tester (LAN Tester) shows everything is correct, the problem still lies on the network cable. Remember that this network cable will not transfer Internet, but data and information to Trydan. ES - Importante. Parpadeará la luz LED en color rojo en caso de existir error de comunicación.
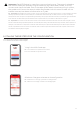
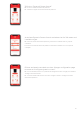
3. Click on “Dynamic Power Control”. ES - Pulsa en ‘Control dinámico de potencia’. PT - Selecione a opção ‘Controlo dinâmico de potência’. 4. Activate Dynamic Power Control and select the V2C 2.0 meter and installation type. ES - Activa el control dinámico de potencia y selecciona el medidor V2C 2.0 y tipo de instalación. PT - Active o controlo dinâmico de potência e selecione o medidor V2C 2.0 e o tipo de instalação. 5.
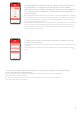
6. Create different time slots and the maximum power available on the installation. In the case of a single power tranche, add the opening hours from 00:00 to 24:00 both daily and on the weekend. If it is a photovoltaic installation, indicate the functioning mode on each time slots. ES - Establece diferentes tramos horarios y la potencia máxima disponible en la instalación. En caso de contar con un único tramo de potencia, añade el horario de 00:00 a 24:00 tanto diario como fin de semana.
YOUR TOMORROW www.v2charge.